Module 13: Transformers
A transformer block’s cost profile has two regimes that fight for the same HBM: attention at O(N²) memory in sequence length, and MLPs at O(N · d²) compute in hidden width. Stack twelve blocks and the attention matrices alone can exceed the weight matrices once N crosses a few thousand tokens, which is why every production LLM ships with KV caching, activation checkpointing, and attention kernels tuned for the SRAM hierarchy. This module wires LayerNorm, MLPs, and causal self-attention into a working GPT so you can see exactly which components hit which wall first.
ARCHITECTURE TIER | Difficulty: ●●●● | Time: 8-10 hours | Prerequisites: 01-08, 10-12
You need tensors, layers, training loops, tokenization, embeddings, and attention already in place. If you can explain how multi-head attention turns queries, keys, and values into a weighted representation, you are ready for this chapter.
Overview
This is the module where everything snaps together. You have tensors, autograd, layers, a training loop, embeddings, and attention. In this module you wire them into a transformer block, stack the blocks, and end up with a working GPT — the same architecture that powers GPT, Claude, and LLaMA. By the end you can run model.generate(prompt) on something you wrote yourself.
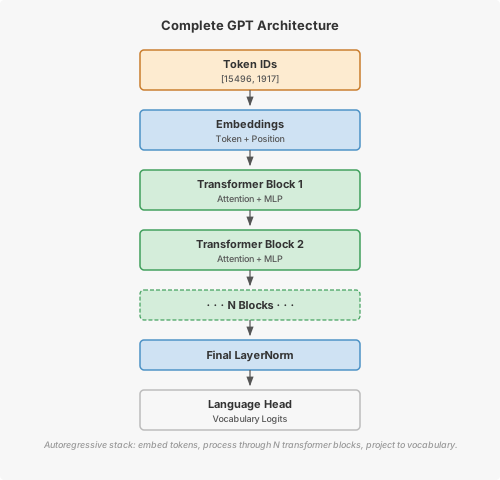
A transformer block is a small recipe: layer-normalize, run multi-head attention, add a residual; layer-normalize, run an MLP, add a residual. That is it. Stack twelve of those between an embedding table and a language head, train on next-token prediction, and you have a language model. At the configuration in the example below (768 wide, twelve blocks, a 50,000-token vocabulary), it has about 163M parameters, 85M of them in the blocks and the rest in the token table and the separate language head.
The patterns you implement here — pre-norm, residual streams, causal masking, 4\(\times\) MLPs — are exactly what runs in production at billion-token scale. The optimizations differ; the architecture does not.
Commands
# first time
tito module start 13

# later sessions
tito module resume 13

# when your tests pass
tito module complete 13
Your notebook is modules/13_transformers/transformers.ipynb.
Learning objectives
- Implement layer normalization to stabilize training across deep networks with learnable scale and shift parameters
- Implement the transformer block forward pass that combines self-attention, feed-forward networks, and residual connections in a pre-norm arrangement
- Trace the supplied GPT model that wires token embeddings, positional encoding, stacked transformer blocks, and autoregressive generation together
- Analyze parameter scaling and memory requirements, understanding why attention memory grows quadratically with sequence length
- Master causal masking to enable autoregressive generation while preventing information leakage from future tokens
What you’ll build
Figure 1 shows the full GPT stack you will assemble, from token IDs at the top down to vocabulary logits at the language head.
The pattern you’ll enable:
# Building and using a complete language model
model = GPT(vocab_size=50000, embed_dim=768, num_layers=12, num_heads=12)
logits = model.forward(tokens)  # Process input sequence
generated = model.generate(prompt, max_new_tokens=50)  # Generate text
What you’re not building yet
To keep this module focused, you will not implement:
- KV caching for efficient generation (production systems cache keys/values to avoid recomputation)
- FlashAttention or other memory-efficient attention (PyTorch uses specialized CUDA kernels)
- Mixture of Experts or sparse transformers (advanced scaling techniques)
- Multi-query or grouped-query attention (used in modern LLMs for efficiency)
You are building the canonical transformer architecture. Optimizations come later.
What you write
The notebook arrives with the surrounding code already written and explained. You write 2 functions, each marked # YOUR CODE HERE and followed by a test cell:
LayerNormFunction.forward- Apply layer normalization to a NumPy array.
TransformerBlock.forward- Forward pass through transformer block.
How you know it works
tito module complete stops at the first step that fails:
- the unit tests inside your notebook run;
- your code is exported into
tinytorch.core.transformers; - the integration tests run against that exported package, together with the modules before it;
- the module is recorded as done, and
tito module statusshows it.
Unit tests in your notebook (5). Each prints a ✅ line when it passes.
- Layer Normalization
- MLP (Feed-Forward Network)
- Transformer Block
- Token Sampling
- Autoregressive Generation
Integration tests after export (18).
tests/13_transformers/test_13_transformers_progressive.py
Completing this module unlocks Milestone 05, Transformer Era (2017) (tito milestone run 05).
When it fails
A bare NotImplementedError with no message means a cell reached a function you have not written yet: the notebook ships each one as # YOUR CODE HERE followed by raise NotImplementedError(). The messages below are ones this module actually prints when an implementation is present but wrong.
Mean should be ~0, got -0.9999988079071045-
From
test_unit_layer_norm. The statistics were taken over the batch axis. Layer normalization averages over the features,axis=-1, withkeepdims=True. Std should be ~1, got 1.1180284023284912-
From
test_unit_layer_norm. The spread was measured with absolute deviations. Variance is the mean of the squared deviations; divide bynp.sqrt(variance + eps).
Finished? Read why
The reasoning behind this module (why it is built this way, what it costs, and how production frameworks differ) is the chapter The Transformer: Assembling GPT from Attention Blocks in the companion book, TinyTorch: From Tensors to Transformers (PDF). The book prints complete reference implementations, so read it after you finish the module, not while you are working on it.
What’s next
You finished the Architecture Tier. You have a transformer that trains, generates text, and matches the structural blueprint of GPT. Everything from here is about making it fast, small, and deployable.
Before that, two milestones take the Architecture Tier on a historical test drive. The Architecture Milestones — a LeNet-style CNN on TinyDigits (Milestone 04) and the Transformer Era training TinyGPT from scratch on Shakespeare (Milestone 05) — run your Conv2d, MaxPool2d, multi-head attention, and TransformerBlock on problems those architectures were built to solve. Convolutional networks exploit spatial structure, while autoregressive causal transformers produce coherent generative language. Both prove that the layers you just wrote behave the way the landmark papers claimed.
First: two Architecture Milestones exercise your Conv/Pool layers (TinyDigits) and your full TinyGPT decoder stack (generative Shakespeare text) on their landmark problems. Then the Optimization Tier opens with the only honest place to start: measurement. Before you optimize anything, you need to know where the time goes. In Module 14 you instrument your transformer’s forward pass and answer concrete questions — how much of a step is spent in attention versus the MLP, how memory grows with sequence length on your machine, and which layer is the actual bottleneck. Every optimization in the chapters that follow (quantization, kernel fusion, KV caching) targets a number you measured in Module 14.
Next: Architecture Milestones, then Module 14: Profiling
How later modules use this one
| Module | What It Does | Your Transformer In Action |
|---|---|---|
| 14: Profiling | Measure performance bottlenecks | profiler.profile_forward_pass(model, x) reveals where time and memory go |
| 15: Quantization | Simulated INT8 | Model the packed size of its Linear weights at a quarter of FP32 and measure the accuracy cost |
| 20: Capstone | Benchmark and report | Measure a baseline and an optimized model and write a schema-validated submission.json |