Image Classification
Using Seeed Studio Grove Vision AI Module V2 (Himax WiseEye2)

In this Lab, we will explore Image Classification using the Seeed Studio Grove Vision AI Module V2, a powerful yet compact device specifically designed for embedded machine learning applications. Based on the Himax WiseEye2 chip, this module is designed to enable AI capabilities on edge devices, making it an ideal tool for Edge Machine Learning (ML) applications.
Introduction
So far, we have explored several computer vision models previously uploaded by Seeed Studio or used the SenseCraft AI Studio for Image Classification, without choosing a specific model. Let’s now develop our Image Classification project from scratch, where we will select our data and model.
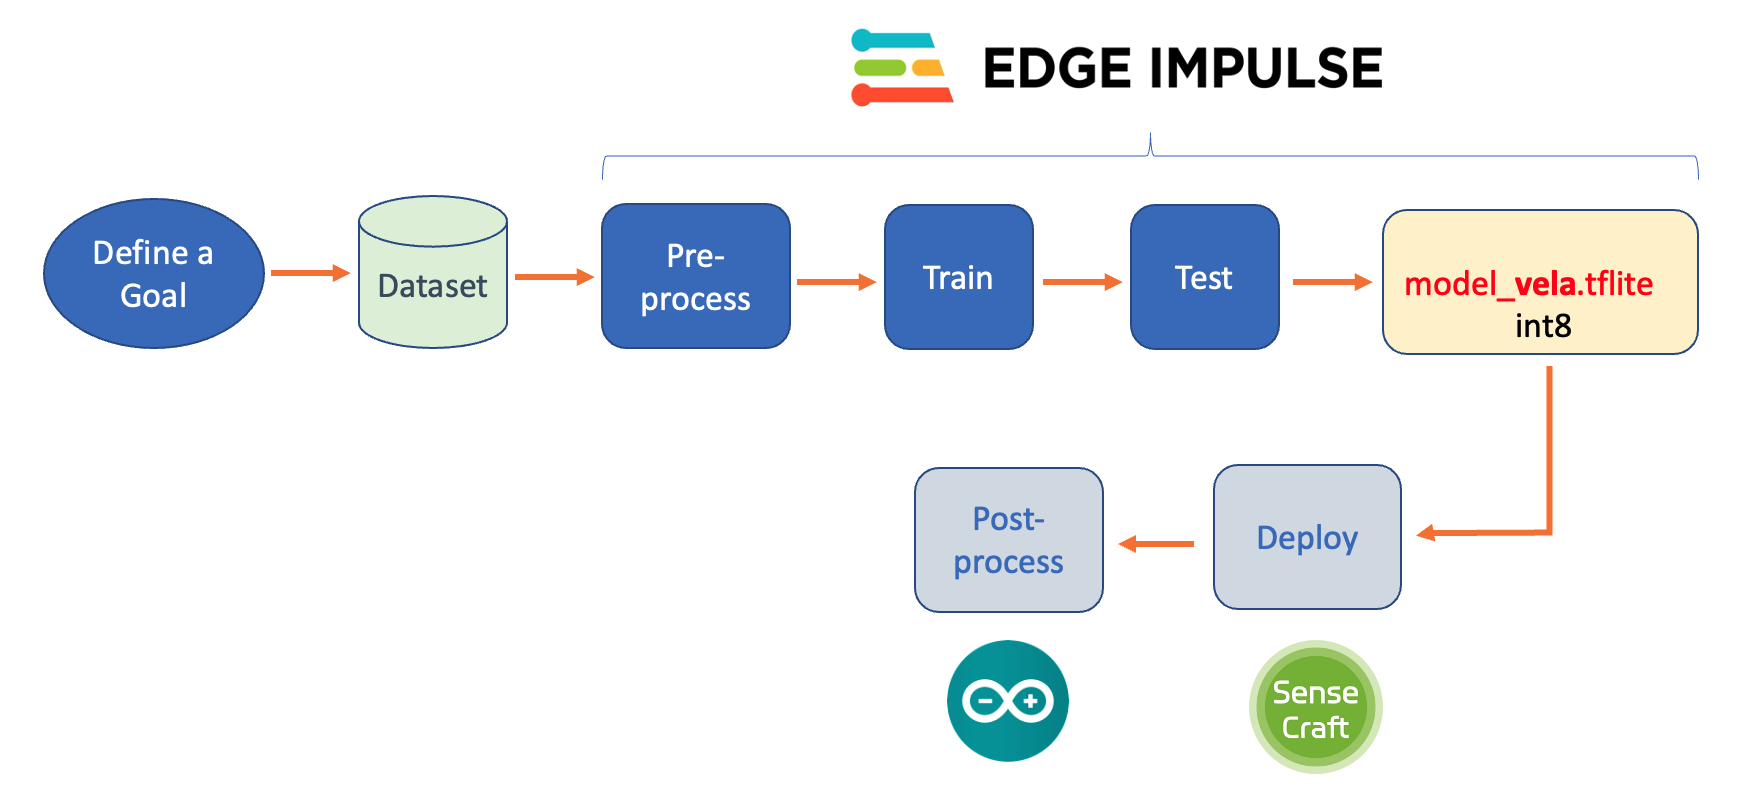
Below, we can see the project’s main steps and where we will work with them:
Project Goal
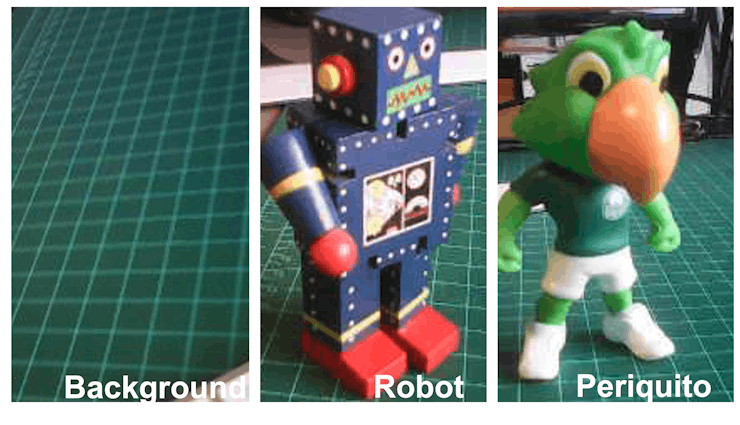
The first step in any machine learning (ML) project is defining the goal. In this case, the goal is to detect and classify two specific objects present in a single image. For this project, we will use two small toys: a robot and a small Brazilian parrot (named Periquito). Also, we will collect images of a background where those two objects are absent.
Data Collection
With the Machine Learning project goal defined, dataset collection is the next and most crucial step. Suppose your project utilizes images that are publicly available on datasets, for example, to be used on a Person Detection project. In that case, you can download the Wake Vision dataset for use in the project.
But, in our case, we define a project where the images do not exist publicly, so we need to generate them. We can use a phone, computer camera, or other devices to capture the photos, offline or connected to the Edge Impulse Studio.
If you want to use the Grove Vision AI V2 to capture your dataset, you can use the SenseCraft AI Studio as we did in the previous Lab, or the camera_web_server sketch as we will describe later in the Postprocessing / Getting the Video Stream section of this Lab.
In this Lab, we will use the SenseCraft AI Studio to collect the dataset.
Collecting Data with the SenseCraft AI Studio
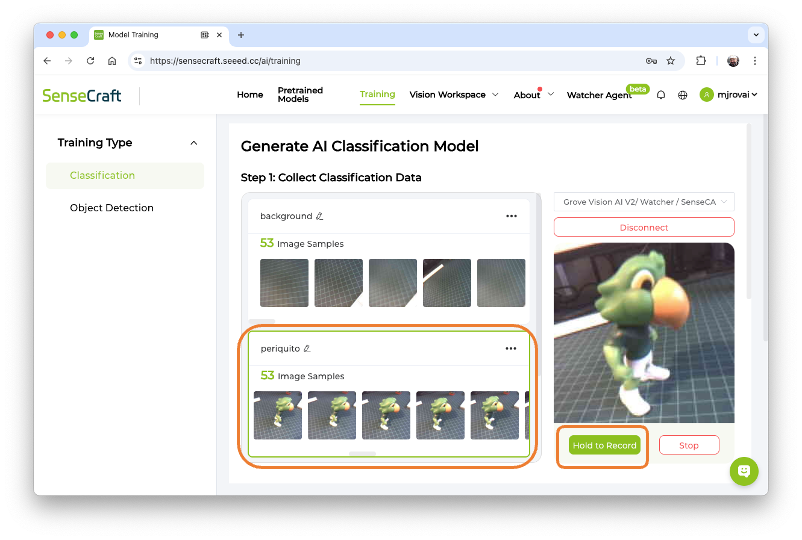
On SenseCraft AI Studio: Let’s open the tab Training.
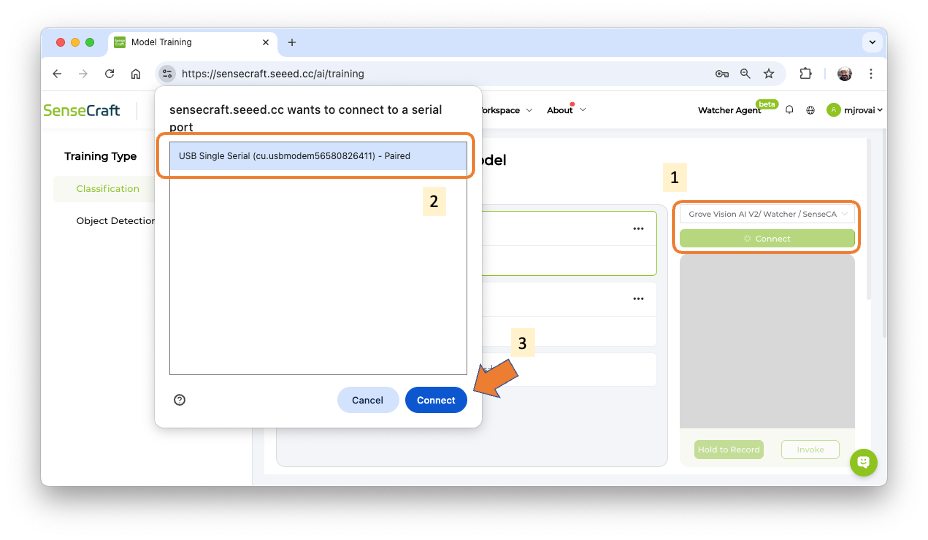
The default is to train a Classification model with a WebCam if it is available. Let’s select the Grove Vision AI V2 instead. Pressing the green button[Connect] (1), a Pop-Up window will appear. Select the corresponding Port (2) and press the blue button [Connect] (3).
The image streamed from the Grove Vision AI V2 will be displayed.
Image Collection
Let’s create the classes, following, for example, an alphabetical order:
- Class1: background
- Class 2: periquito
- Class 3: robot
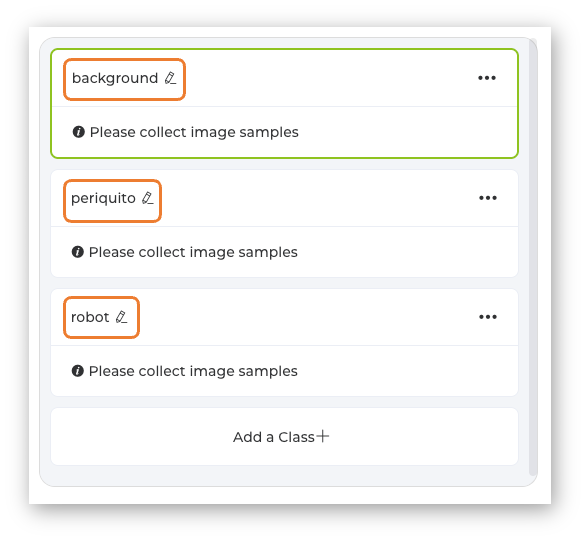
Select one of the classes (note that a green line will be around the window) and keep pressing the green button under the preview area. The collected images will appear on the Image Samples Screen.
After collecting the images, review them and, if necessary, delete any incorrect ones.

Collect around 50 images from each class. After you collect the three classes, open the menu on each of them and select Export Data.
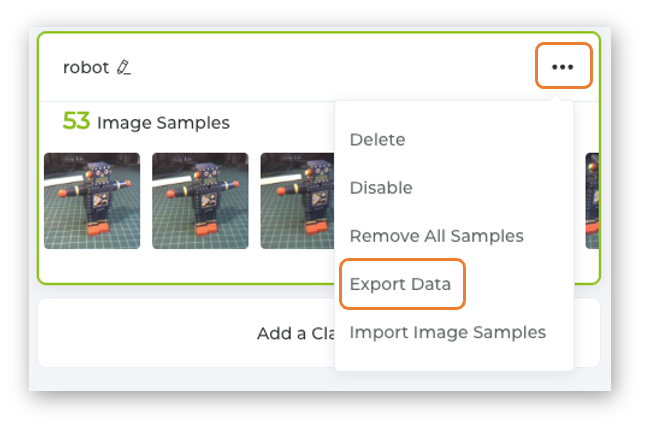
In the Download area of the Computer, we will get three zip files, each one with its corresponding class name. Each Zip file contains a folder with the images.
Uploading the dataset to the Edge Impulse Studio
We will use the Edge Impulse Studio to train our model. Edge Impulse is a leading development platform for machine learning on edge devices.
- Enter your account credentials (or create a free account) at Edge Impulse.
- Next, create a new project:

The dataset comprises approximately 50 images per label, with 40 for training and 10 for testing.
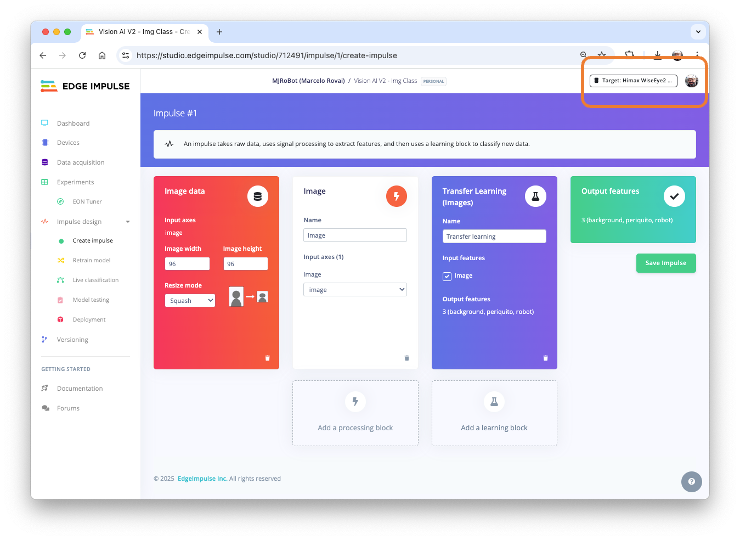
Impulse Design and Pre-Processing
Impulse Design
An impulse takes raw data (in this case, images), extracts features (resizes pictures), and then uses a learning block to classify new data.
Classifying images is the most common application of deep learning, but a substantial amount of data is required to accomplish this task. We have around 50 images for each category. Is this number enough? Not at all! We will need thousands of images to “teach” or “model” each class, allowing us to differentiate them. However, we can resolve this issue by retraining a previously trained model using thousands of images. We refer to this technique as “Transfer Learning” (TL). With TL, we can fine-tune a pre-trained image classification model on our data, achieving good performance even with relatively small image datasets, as in our case.
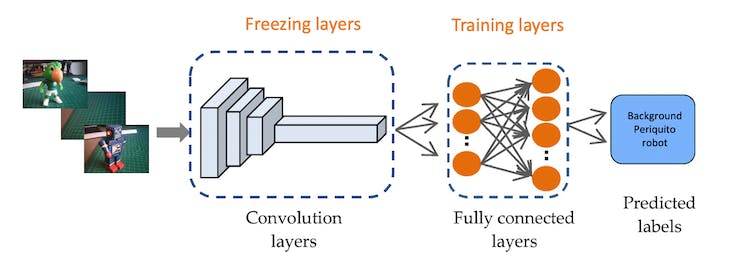
So, starting from the raw images, we will resize them (96x96) pixels and feed them to our Transfer Learning block:
For comparison, we will keep the image size as 96 x 96. However, keep in mind that with the Grove Vision AI Module V2 and its internal SRAM of 2.4 MB, larger images can be utilized (for example, 160 x 160).
Also select the Target device (Himax WiseEye2 (M55 400 MHz + U55)) on the up-right corner.
Pre-processing (Feature generation)
Besides resizing the images, we can convert them to grayscale or retain their original RGB color depth. Let’s select [RGB] in the Image section. Doing that, each data sample will have a dimension of 27,648 features (96x96x3). Pressing [Save Parameters] will open a new tab, Generate Features. Press the button [Generate Features]to generate the features.
Model Design, Training, and Test
In 2007, Google introduced MobileNetV1. In 2018, MobileNetV2: Inverted Residuals and Linear Bottlenecks, was launched, and, in 2019, the V3. The Mobilinet is a family of general-purpose computer vision neural networks explicitly designed for mobile devices to support classification, detection, and other applications. MobileNets are small, low-latency, low-power models parameterized to meet the resource constraints of various use cases.
Although the base MobileNet architecture is already compact and has low latency, a specific use case or application may often require the model to be even smaller and faster. MobileNets introduce a straightforward parameter, α (alpha), called the width multiplier to construct these smaller, less computationally expensive models. The role of the width multiplier α is to thin a network uniformly at each layer.
Edge Impulse Studio has available MobileNet V1 (96x96 images) and V2 (96x96 and 160x160 images), with several different α values (from 0.05 to 1.0). For example, you will get the highest accuracy with V2, 160x160 images, and α=1.0. Of course, there is a trade-off. The higher the accuracy, the more memory (around 1.3M RAM and 2.6M ROM) will be needed to run the model, implying more latency. The smaller footprint will be obtained at another extreme with MobileNet V1 and α=0.10 (around 53.2K RAM and 101K ROM).
For comparison, we will use the MobileNet V2 0.1 as our base model (but a model with a greater alpha can be used here). The final layer of our model, preceding the output layer, will have 8 neurons with a 10% dropout rate for preventing overfitting.
Another necessary technique to use with deep learning is data augmentation. Data augmentation is a method that can help improve the accuracy of machine learning models by creating additional artificial data. A data augmentation system makes small, random changes to your training data during the training process (such as flipping, cropping, or rotating the images).
Set the Hyperparameters:
- Epochs: 20,
- Bach Size: 32
- Learning Rate: 0.0005
- Validation size: 20%
Training result:
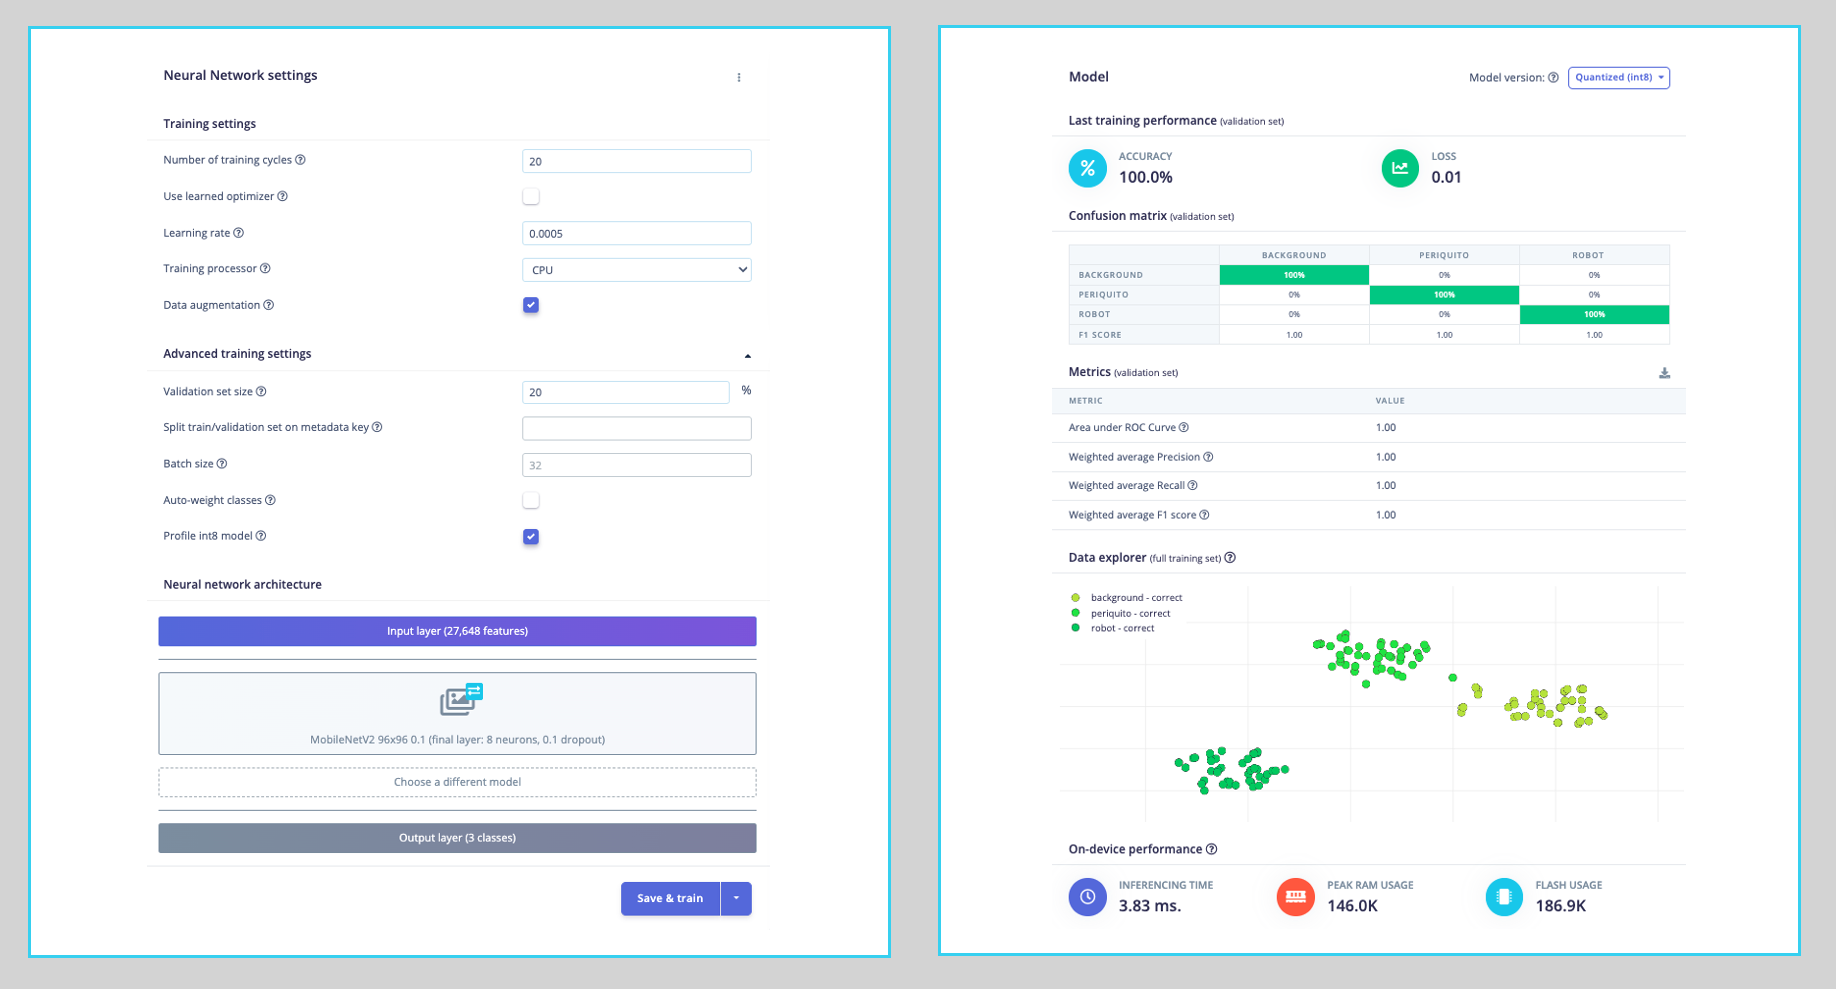
The model profile predicts 146 KB of RAM and 187 KB of Flash, indicating no problem with the Grove AI Vision (V2), which has almost 2.5 MB of internal SRAM. Additionally, the Studio indicates a latency of around 4 ms.
Despite this, with a 100% accuracy on the Validation set when using the spare data for testing, we confirmed an Accuracy of 81%, using the Quantized (Int8) trained model. However, it is sufficient for our purposes in this lab.
Model Deployment
On the Deployment tab, we should select: Seeed Grove Vision AI Module V2 (Himax WiseEye2) and press [Build]. A ZIP file will be downloaded to our computer.
The Zip file contains the model_vela.tflite, which is a TensorFlow Lite (TFLite) model optimized for neural processing units (NPUs) using the Vela compiler, a tool developed by Arm to adapt TFLite models for Ethos-U NPUs.

We can flash the model following the instructions in the README.txt or use the SenseCraft AI Studio. We will use the latter.
Deploy the model on the SenseCraft AI Studio
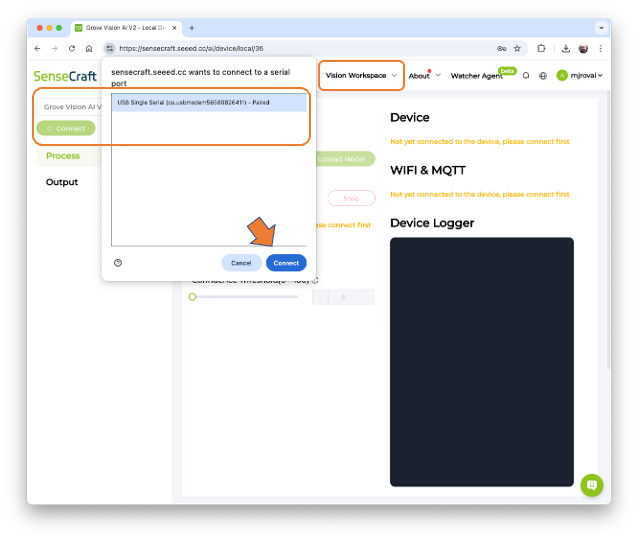
On SenseCraft AI Studio, go to the Vision Workspace tab, and connect the device:
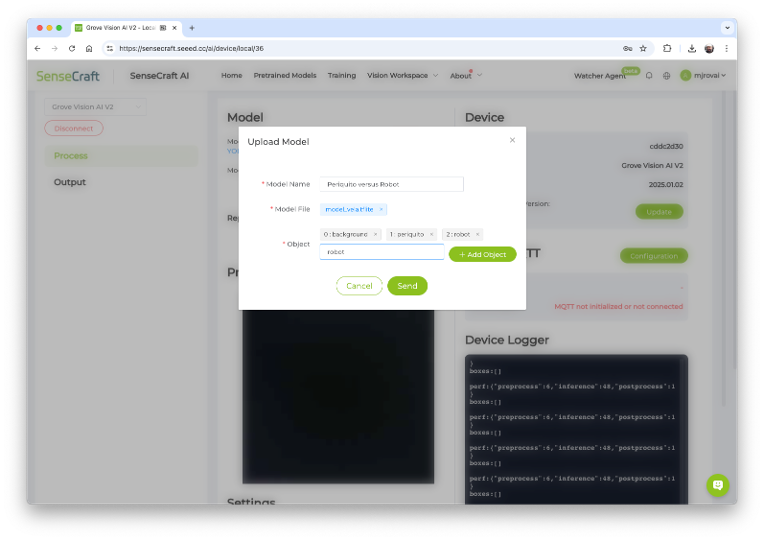
You should see the last model that was uploaded to the device. Select the green button [Upload Model]. A pop-up window will ask for the model name, the model file, and to enter the class names (objects). We should use labels following alphabetical order: 0: background, 1: periquito, and 2: robot, and then press [Send].
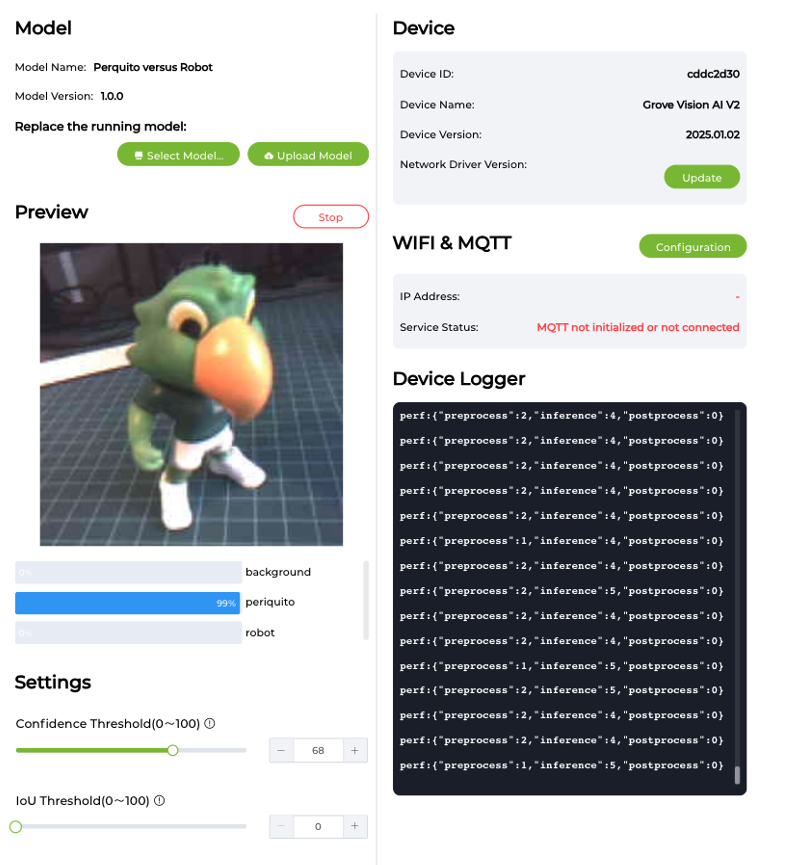
After a few seconds, the model will be uploaded (“flashed”) to our device, and the camera image will appear in real-time on the Preview Sector. The Classification result will be displayed under the image preview. It is also possible to select the Confidence Threshold of your inference using the cursor on Settings.
On the Device Logger, we can view the Serial Monitor, where we can observe the latency, which is approximately 1 to 2 ms for pre-processing and 4 to 5 ms for inference, aligning with the estimates made in Edge Impulse Studio.
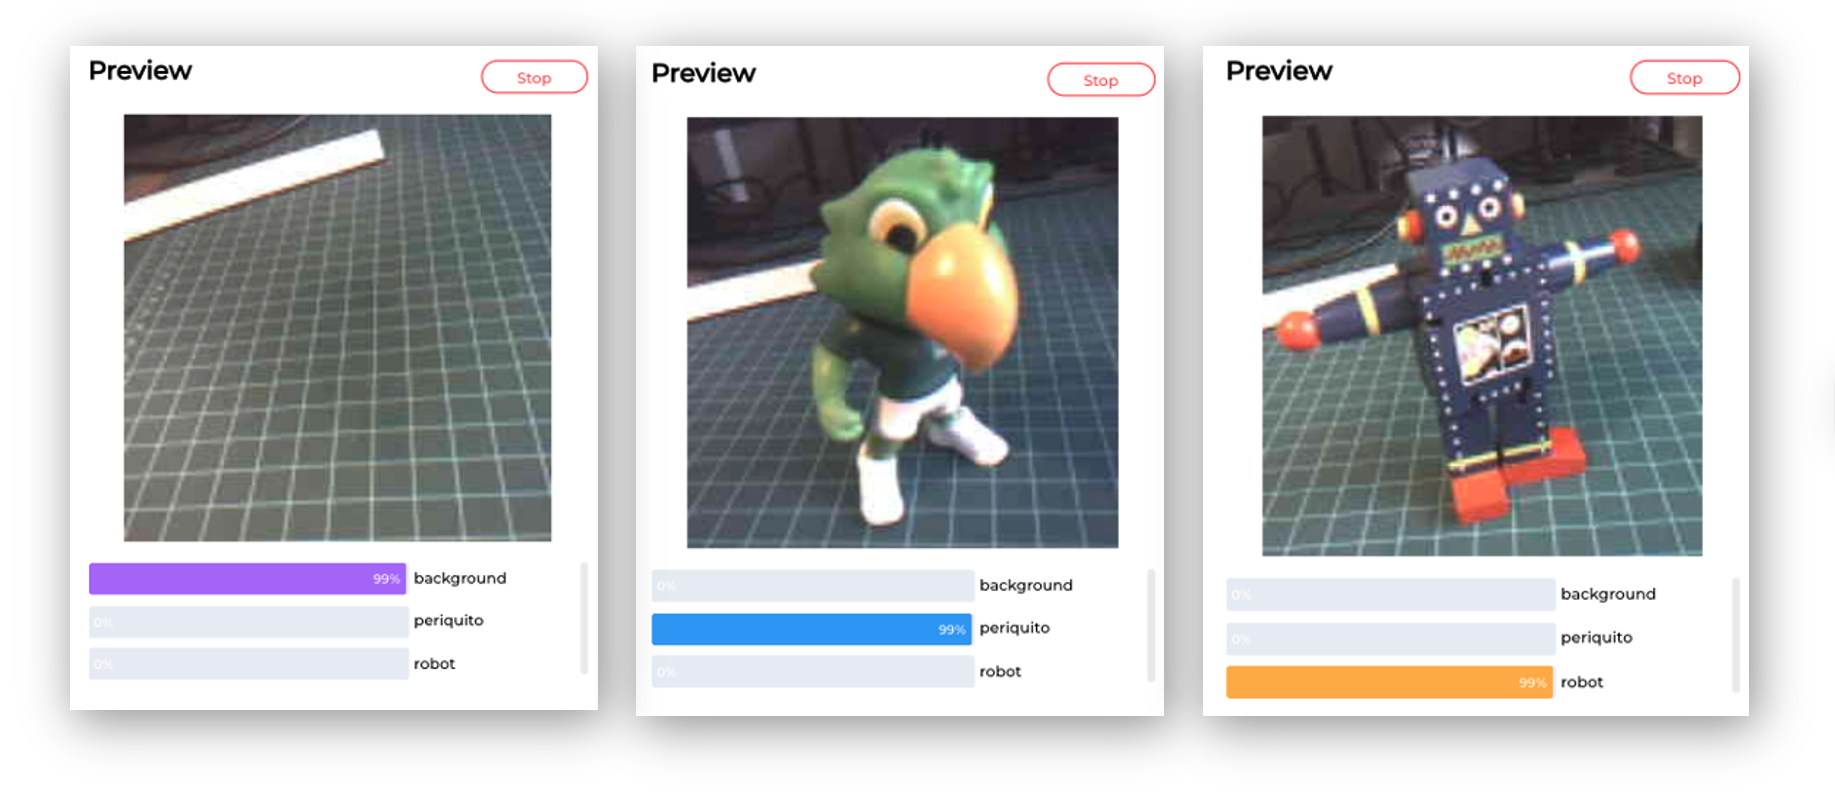
Here are other screenshots:
The power consumption of this model is approximately 70 mA, equivalent to 0.4 W.
Image Classification (non-official) Benchmark
Several development boards can be used for embedded machine learning (tinyML), and the most common ones (so far) for Computer Vision applications (with low energy) are the ESP32 CAM, the Seeed XIAO ESP32S3 Sense, and the Arduino Nicla Vision.
Taking advantage of this opportunity, a similarly trained model, MobilenetV2 96x96, with an alpha of 0.1, was also deployed on the ESP-CAM, the XIAO, and a Raspberry Pi Zero W2. Here is the result:
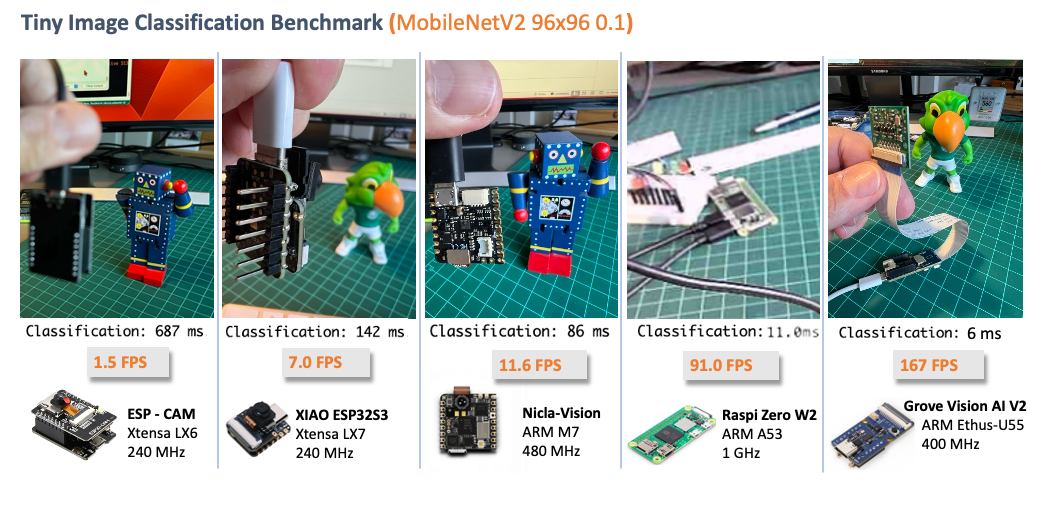
The Grove Vision AI V2 with an ARM Ethos-U55 was approximately 14 times faster than devices with an ARM-M7, and more than 100 times faster than an Xtensa LX6 (ESP-CAM). Even when compared to a Raspberry Pi, with a much more powerful CPU, the U55 reduces latency by almost half. Additionally, the power consumption is lower than that of other devices (see the full article here for power consumption comparison).
Postprocessing
Now that we have the model uploaded to the board and working correctly, classifying our images, let’s connect a Master Device to export the inference result to it and see the result completely offline (disconnected from the PC and, for example, powered by a battery).
Note that we can use any microcontroller as a Master Controller, such as the XIAO, Arduino, or Raspberry Pi.
Getting the Video Stream
The image processing and model inference are processed locally in Grove Vision AI (V2), and we want the result to be output to the XIAO (Master Controller) via IIC. For that, we will use the Arduino SSMA library. This library’s primary purpose is to process Grove Vision AI’s data stream, which does not involve model inference.
The Grove Vision AI (V2) communicates (Inference result) with the XIAO via the IIC; the device’s IIC address is 0x62. Image information transfer is via the USB serial port.
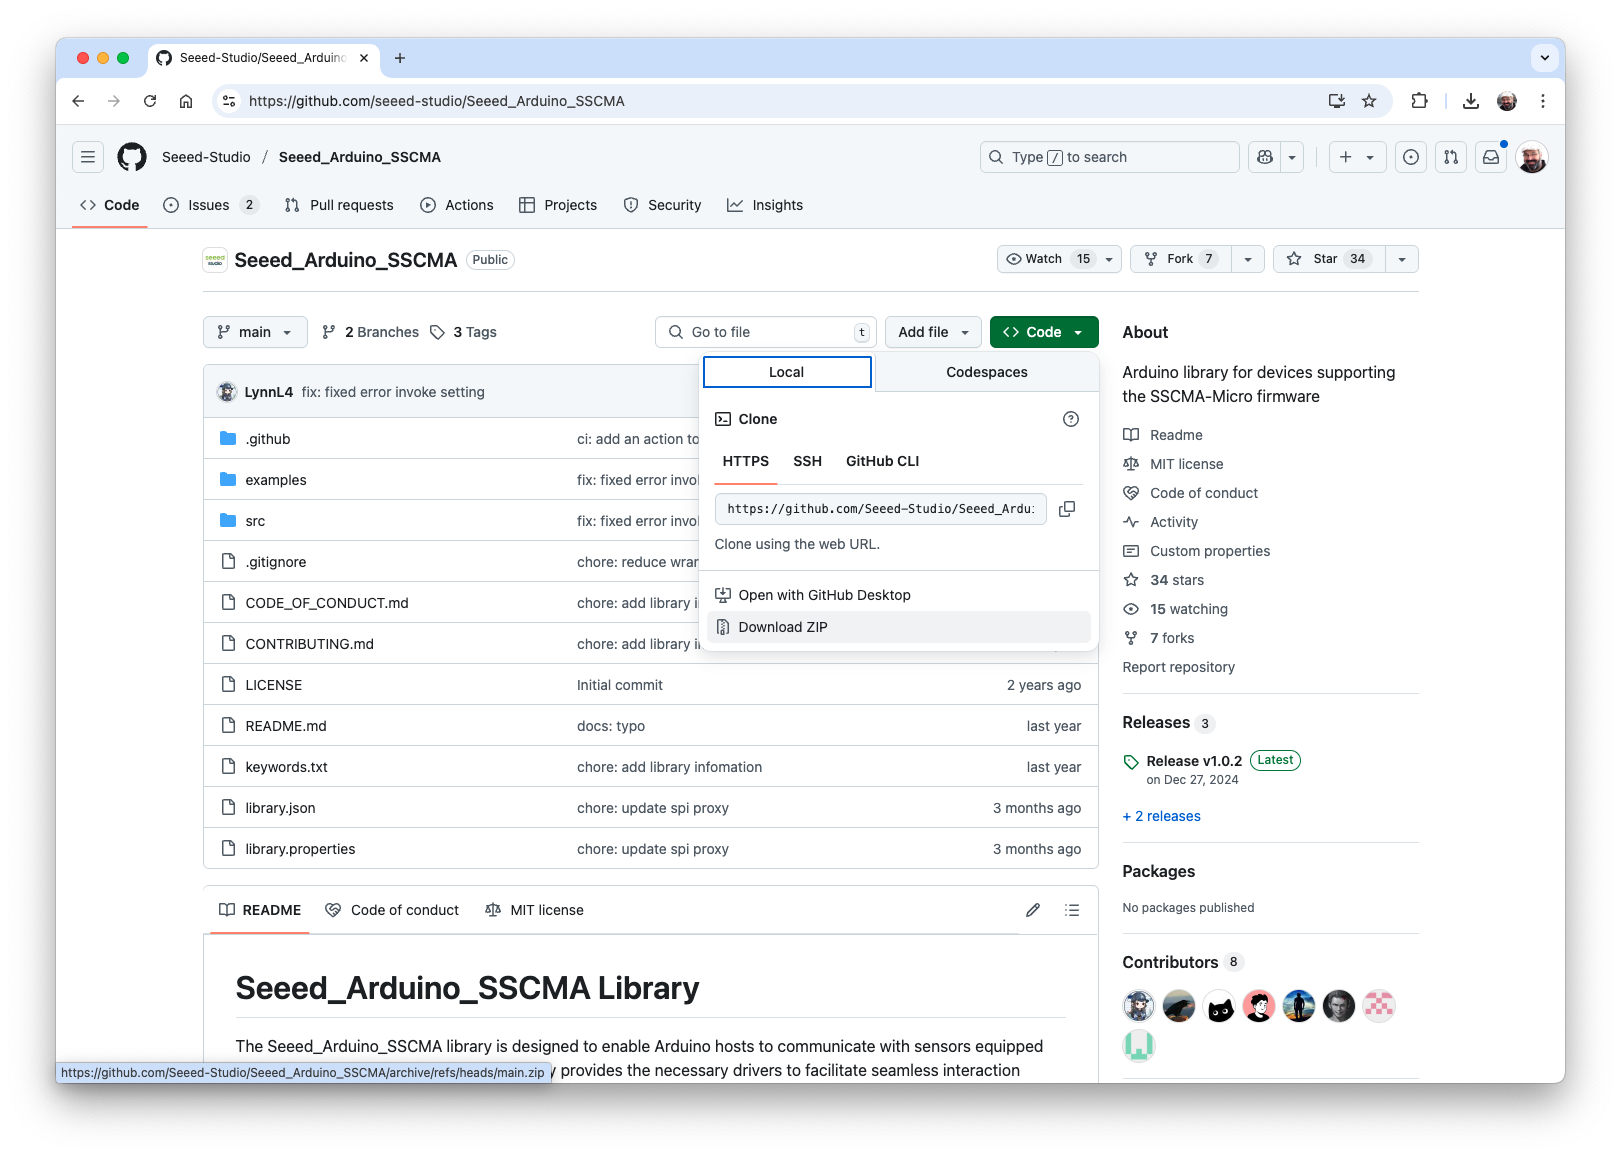
Step 1: Download the Arduino SSMA library as a zip file from its GitHub:
Step 2: Install it in the Arduino IDE (sketch > Include Library > Add .Zip Library).
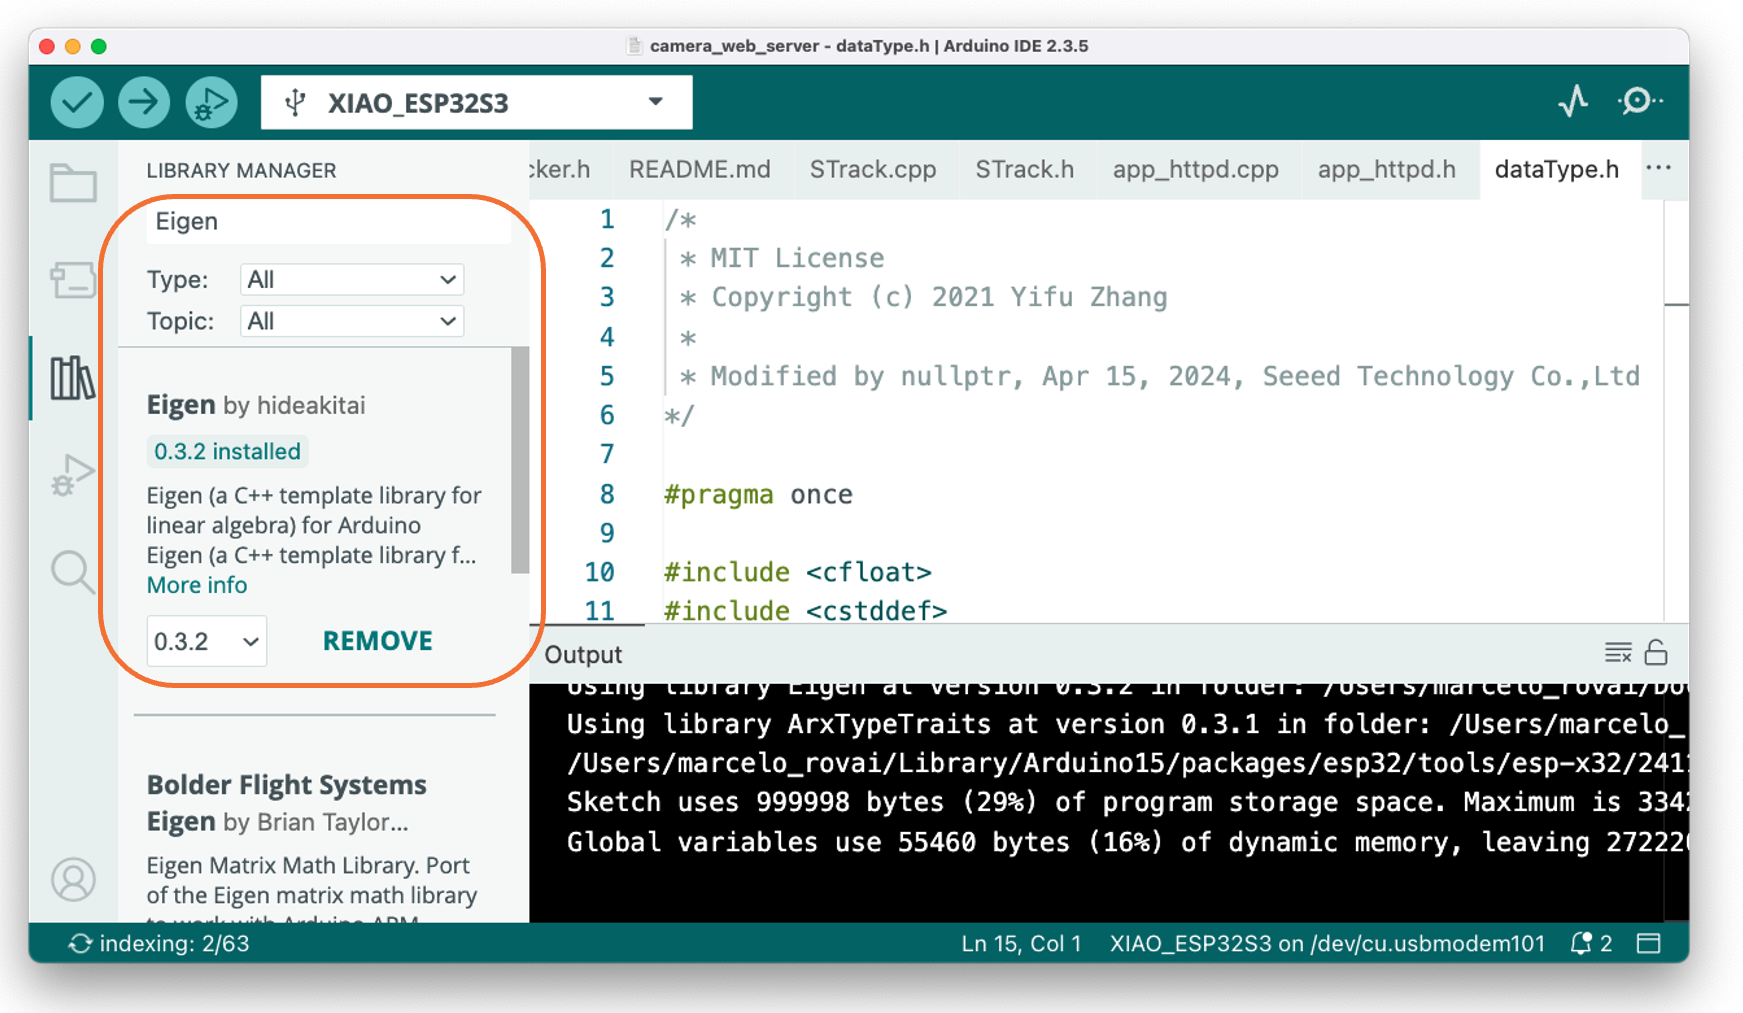
Step 3: Install the ArduinoJSON library.

Step 4: Install the Eigen Library
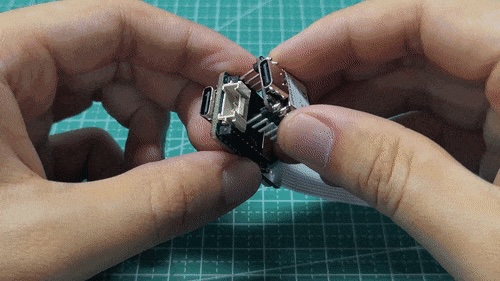
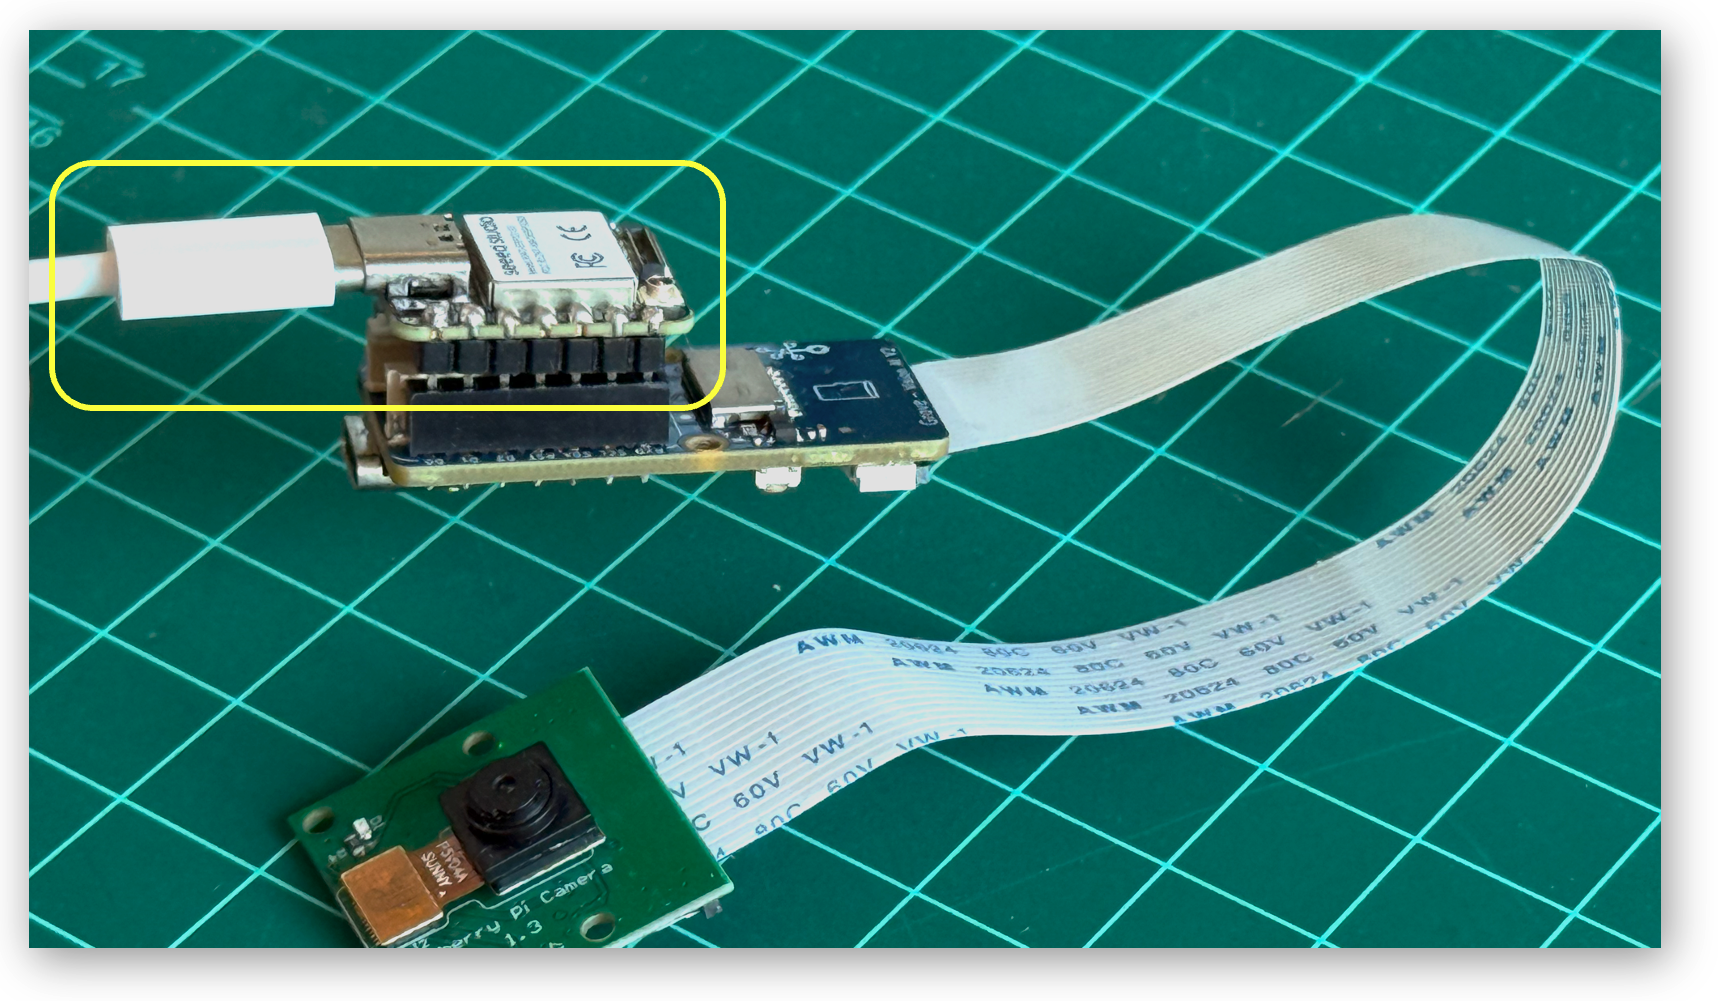
Step 3: Now, connect the XIAO and Grove Vision AI (V2) via the socket (a row of pins) located at the back of the device.
CAUTION: Please note the direction of the connection, Grove Vision AI’s Type-C connector should be in the same direction as XIAO’s Type-C connector.
Step 5: Connect the XIAO USB-C port to your computer
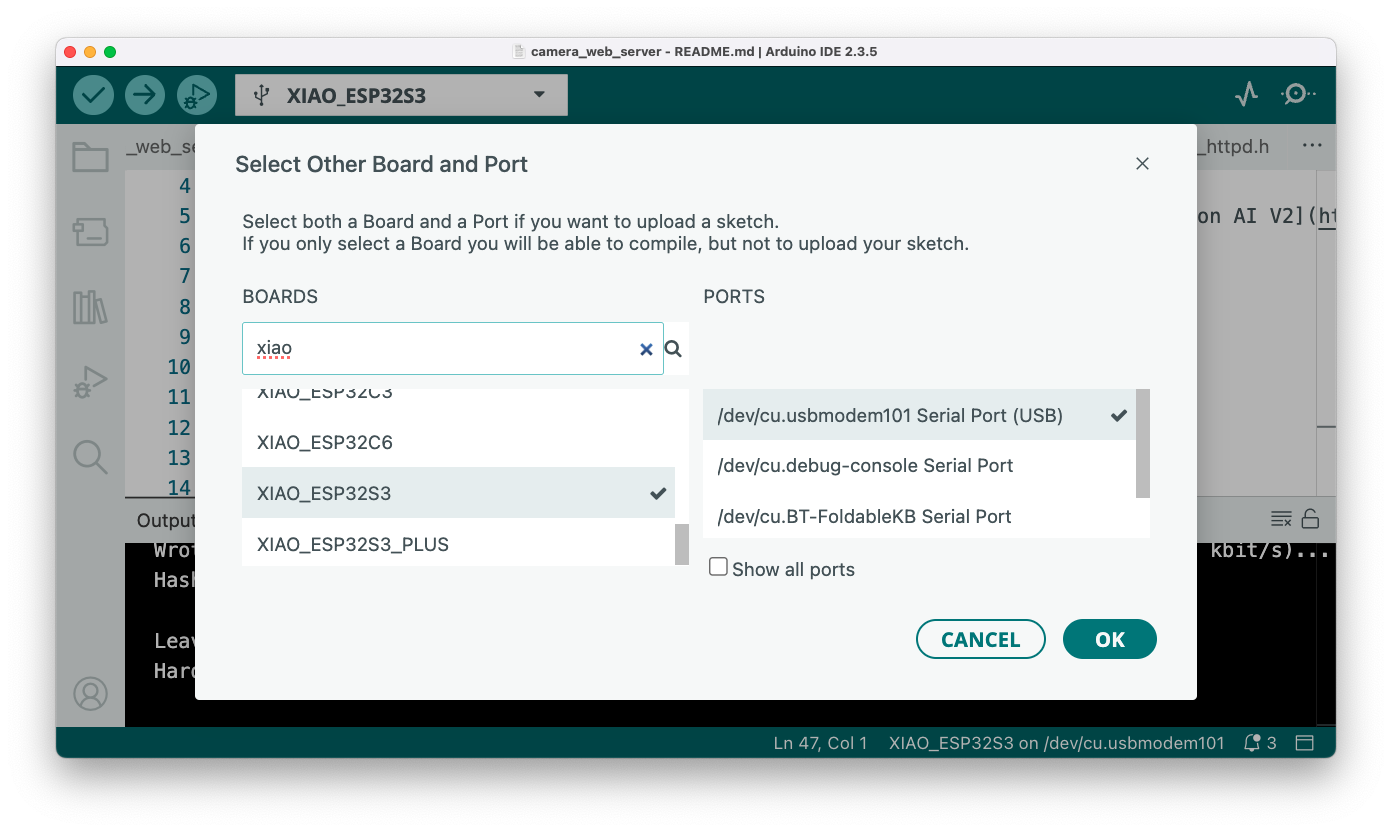
Step 6: In the Arduino IDE, select the Xiao board and the corresponding USB port.
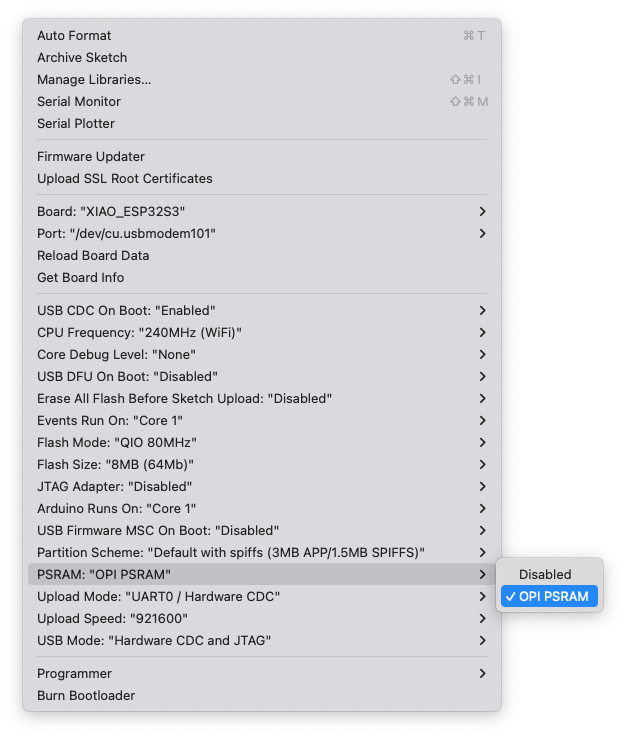
Once we want to stream the video to a webpage, we will use the XIAO ESP32S3, which has wifi and enough memory to handle images. Select XIAO_ESP32S3 and the appropriate USB Port:
By default, the PSRAM is disabled. Open the Tools menu and on PSRAM: "OPI PSRAM"select OPI PSRAM.
Step 7: Open the example in Arduino IDE:
File -> Examples -> Seeed_Arduino_SSCMA -> camera_web_server.
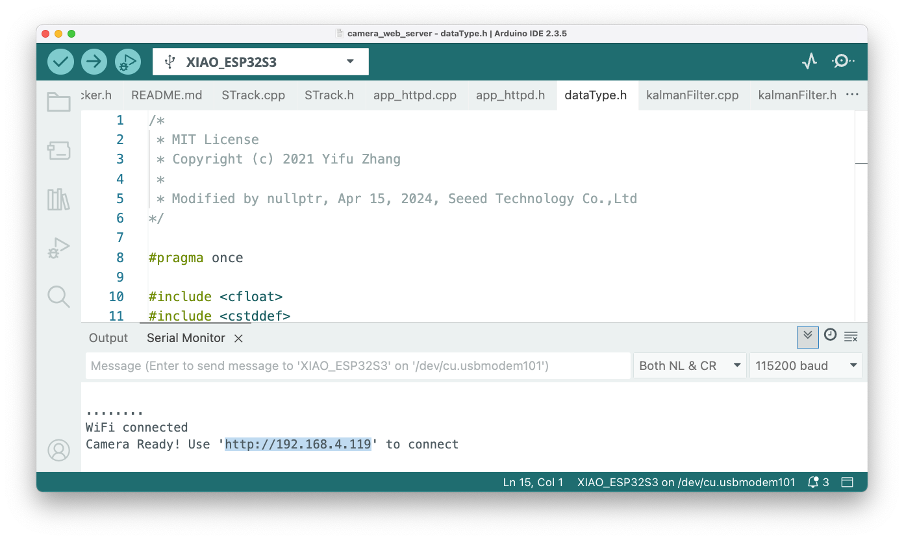
And edit the ssid and password in the camera_web_server.ino sketch to match the Wi-Fi network.
Step 8: Upload the sketch to the board and open the Serial Monitor. When connected to the Wi-Fi network, the board’s IP address will be displayed.
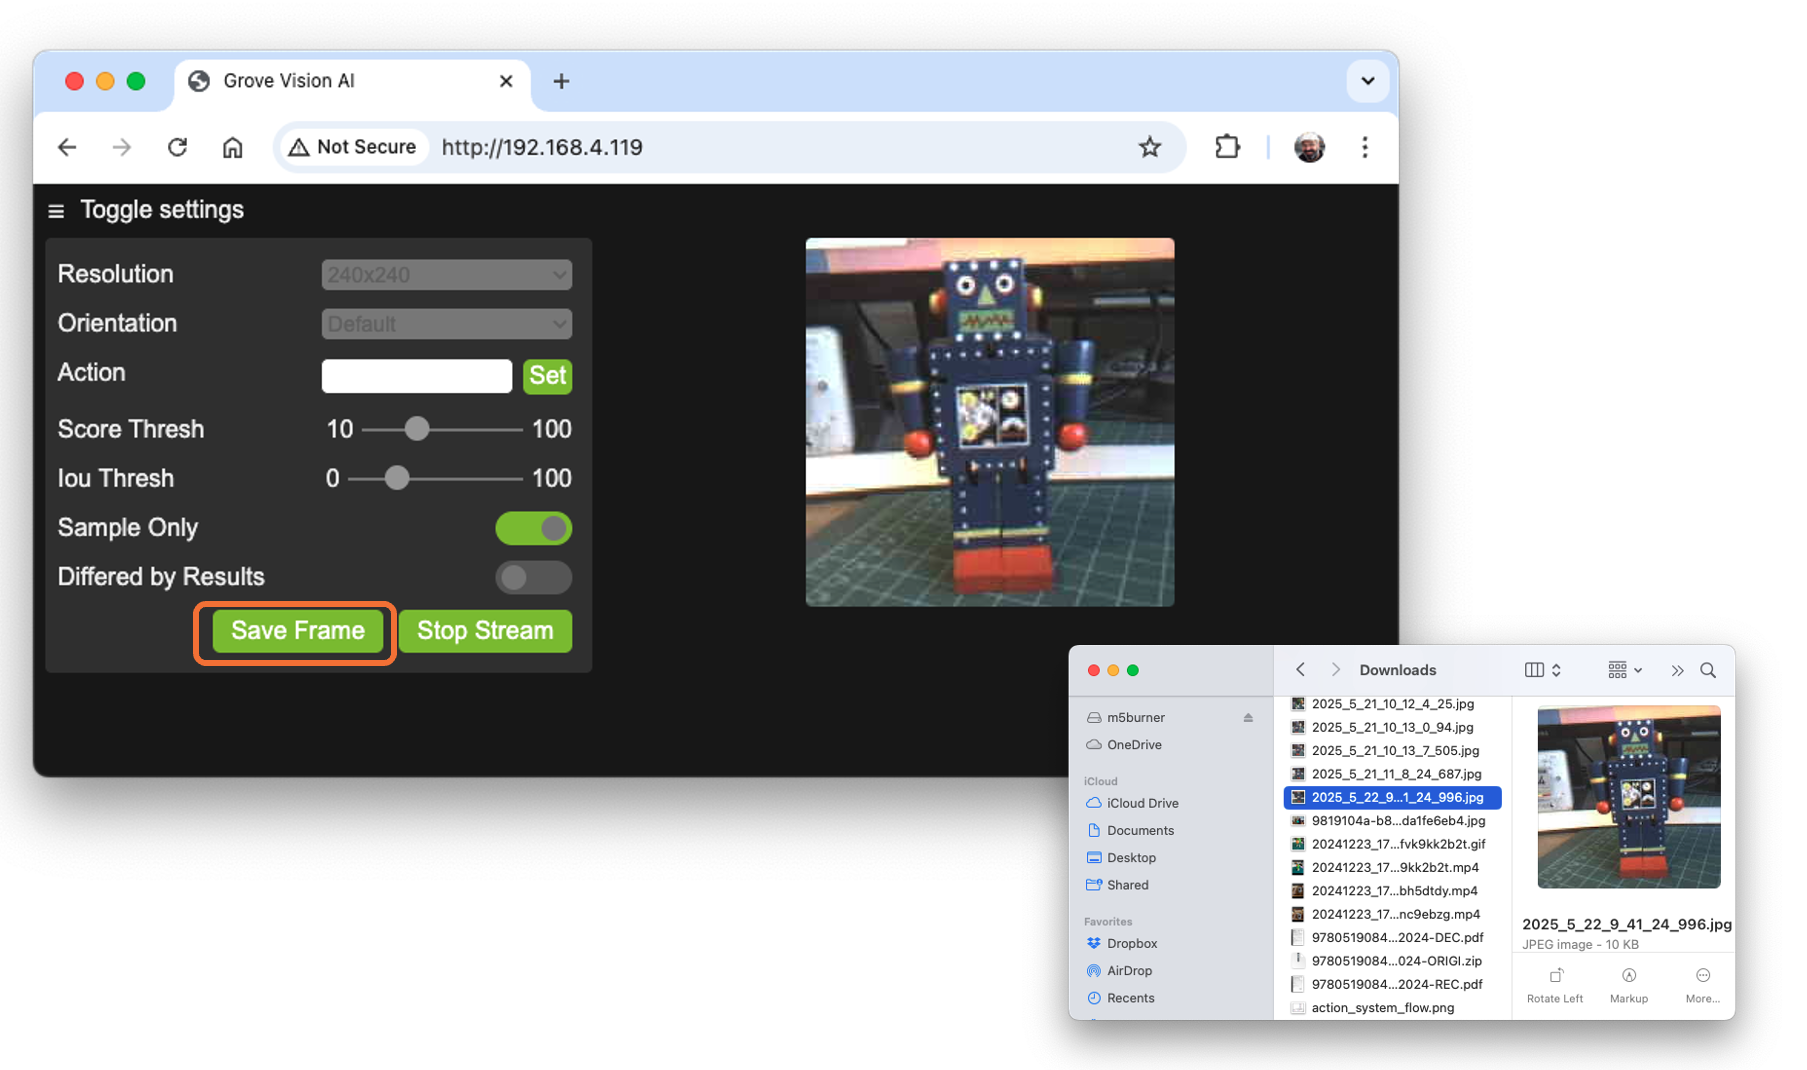
Open the address using a web browser. A Video App will be available. To see only the video stream from the Grove Vision AI V2, press [Sample Only] and [Start Stream].
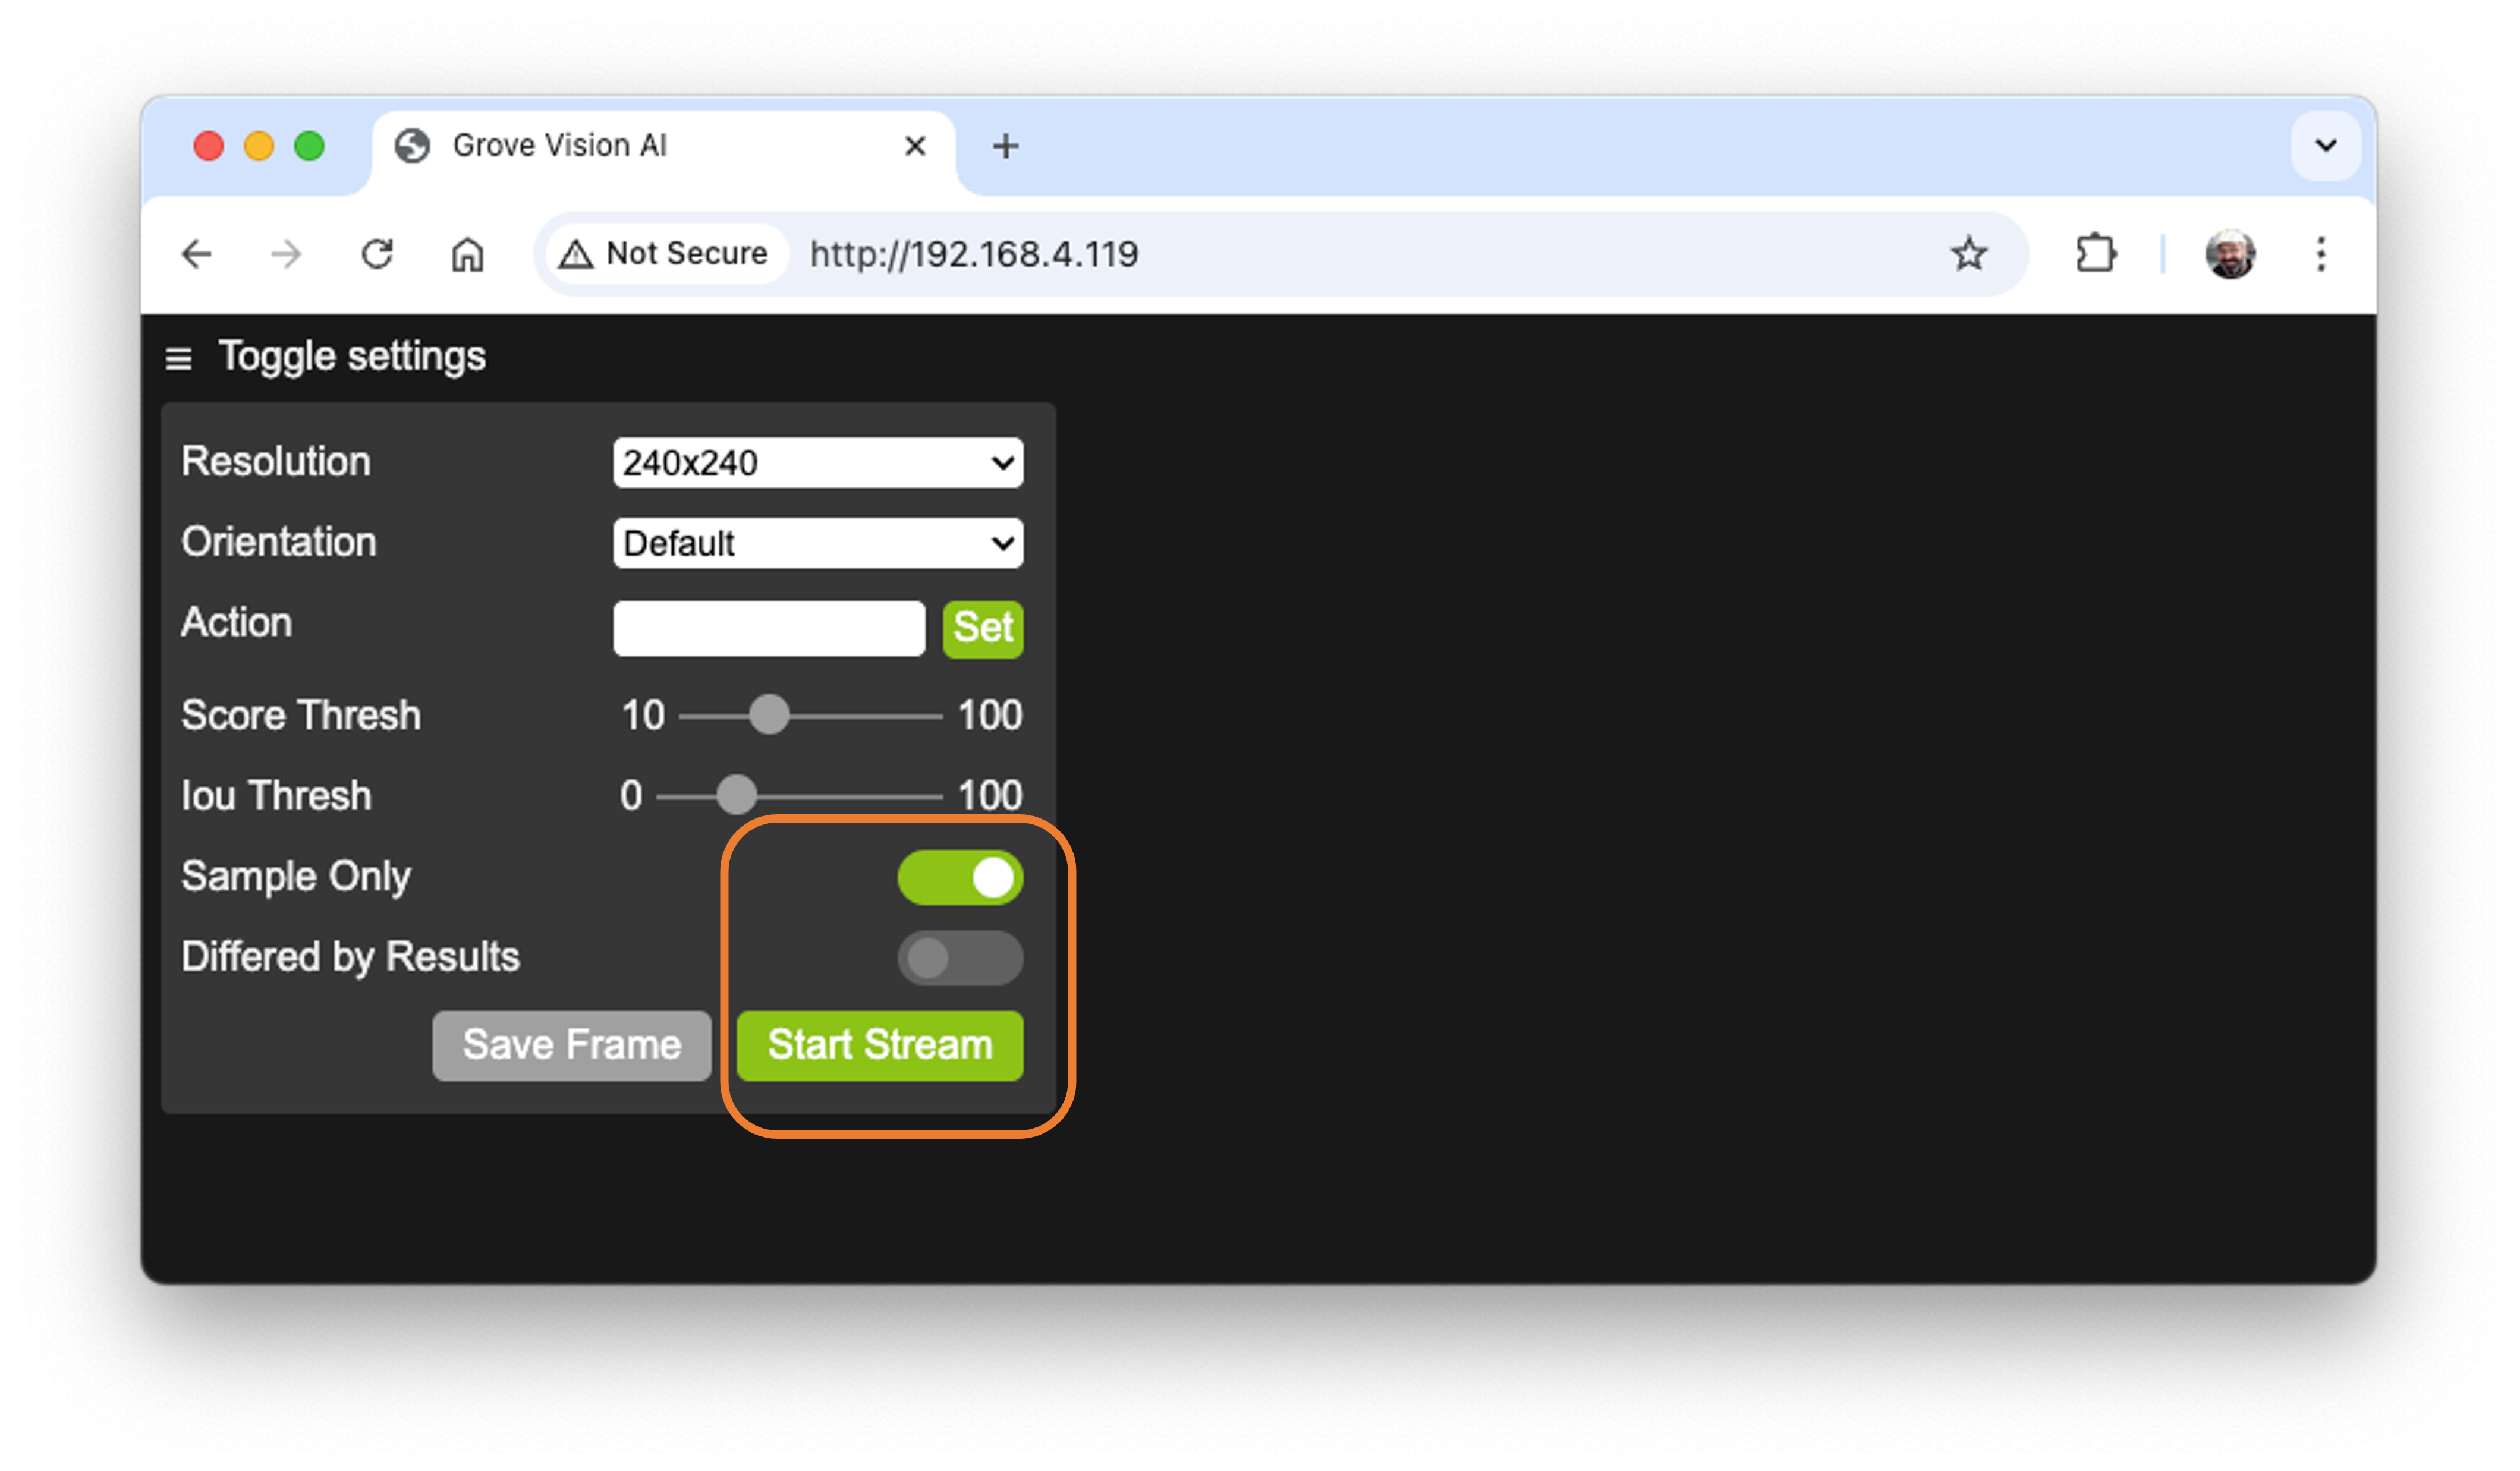
If you want to create an image dataset, you can use this app, saving frames of the video generated by the device. Pressing [Save Frame], the image will be saved in the download area of our desktop.
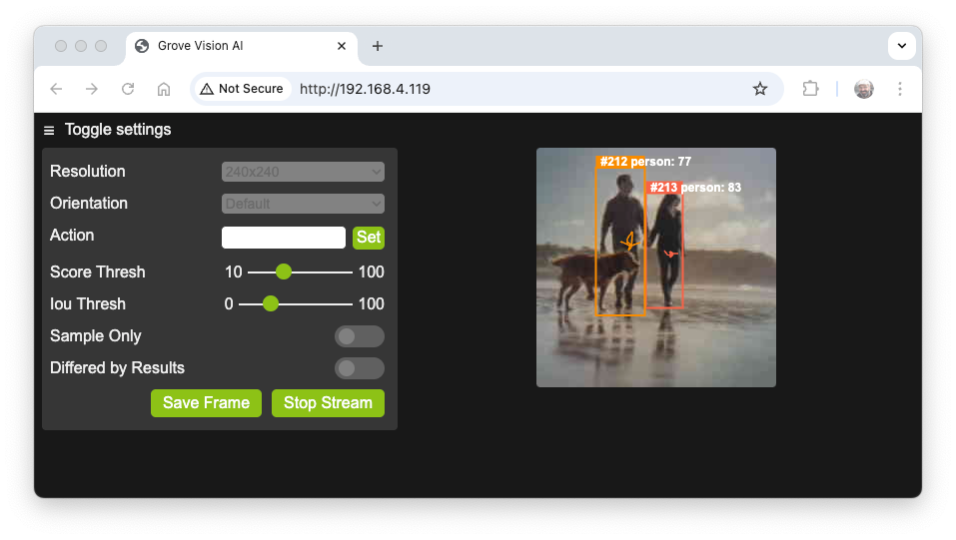
Opening the App without selecting [Sample Only], the inference result should appear on the video screen, but this does not happen for Image Classification. For Object Detection or Pose Estimation, the result is embedded with the video stream.
For example, if the model is a Person Detection using YoloV8:
Getting the Inference Result
Go to
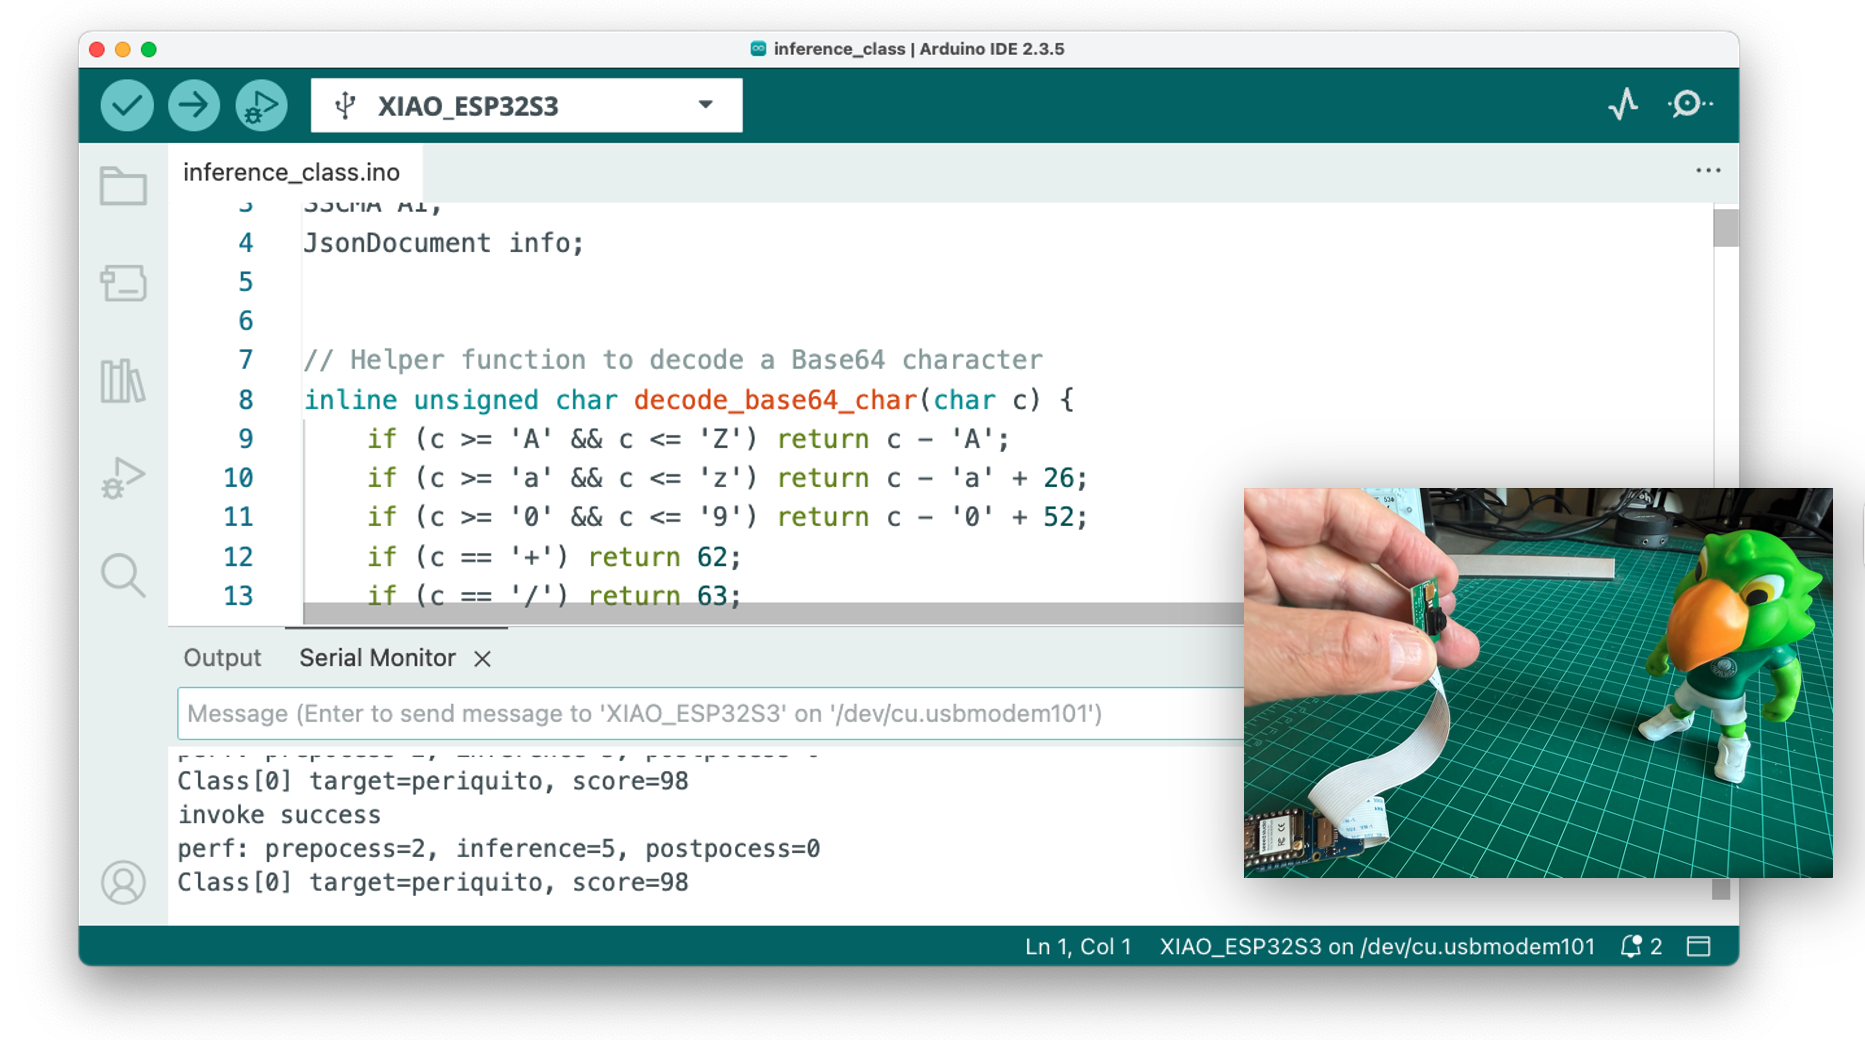
File->Examples->Seeed_Arduino_SSCMA->inference_class.Upload the sketch to the board, and open the Serial Monitor.
Pointing the camera at one of our objects, we can see the inference result on the Serial Terminal.
The inference running on the Arduino IDE had an average consumption of 160 mA or 800 mW and a peak of 330 mA 1.65 W when transmitting the image to the App.
Postprocessing with LED
The idea behind our postprocessing is that whenever a specific image is detected (for example, the Periquito - Label:1), the User LED is turned on. If the Robot or a background is detected, the LED will be off.
Copy the below code and past it to your IDE:
#include <Seeed_Arduino_SSCMA.h>
SSCMA AI;

void setup()
{
    AI.begin();

    Serial.begin(115200);
    while (!Serial);
    Serial.println("Inferencing - Grove AI V2 / XIAO ESP32S3");

    // Pins for the built-in LED
    pinMode(LED_BUILTIN, OUTPUT);
    // Ensure the LED is OFF by default.
    // Note: The LED is ON when the pin is LOW, OFF when HIGH.
    digitalWrite(LED_BUILTIN, HIGH);
}

void loop()
{
    if (!AI.invoke()){
        Serial.println("\nInvoke Success");
        Serial.print("Latency [ms]: prepocess=");
        Serial.print(AI.perf().prepocess);
        Serial.print(", inference=");
        Serial.print(AI.perf().inference);
        Serial.print(", postpocess=");
        Serial.println(AI.perf().postprocess);
        int pred_index = AI.classes()[0].target;
        Serial.print("Result= Label: ");
        Serial.print(pred_index);
        Serial.print(", score=");
        Serial.println(AI.classes()[0].score);
        turn_on_led(pred_index);
    }
}

/**
* @brief      turn_off_led function - turn-off the User LED
*/
void turn_off_led(){
    digitalWrite(LED_BUILTIN, HIGH);
}

/**
* @brief      turn_on_led function used to turn on the User LED
* @param[in]  pred_index
*             label 0: [0] ==> ALL OFF
*             label 1: [1] ==> LED ON
*             label 2: [2] ==> ALL OFF
*             label 3: [3] ==> ALL OFF
*/
void turn_on_led(int pred_index) {
    switch (pred_index)
    {
        case 0:
            turn_off_led();
            break;
        case 1:
            turn_off_led();
            digitalWrite(LED_BUILTIN, LOW);
            break;
        case 2:
            turn_off_led();
            break;
        case 3:
            turn_off_led();
            break;
    }
}
This sketch uses the Seeed_Arduino_SSCMA.h library to interface with the Grove Vision AI Module V2. The AI module and the LED are initialized in the setup() function, and serial communication is started.
The loop() function repeatedly calls the invoke() method to perform inference using the built-in algorithms of the Grove Vision AI Module V2. Upon a successful inference, the sketch prints out performance metrics to the serial monitor, including preprocessing, inference, and postprocessing times.
The sketch processes and prints out detailed information about the results of the inference:
- (
AI.classes()[0]) that identifies the class of image (.target) and its confidence score (.score). - The inference result (class) is stored in the integer variable
pred_index, which will be used as an input to the functionturn_on_led(). As a result, the LED will turn ON, depending on the classification result.
Here is the result:
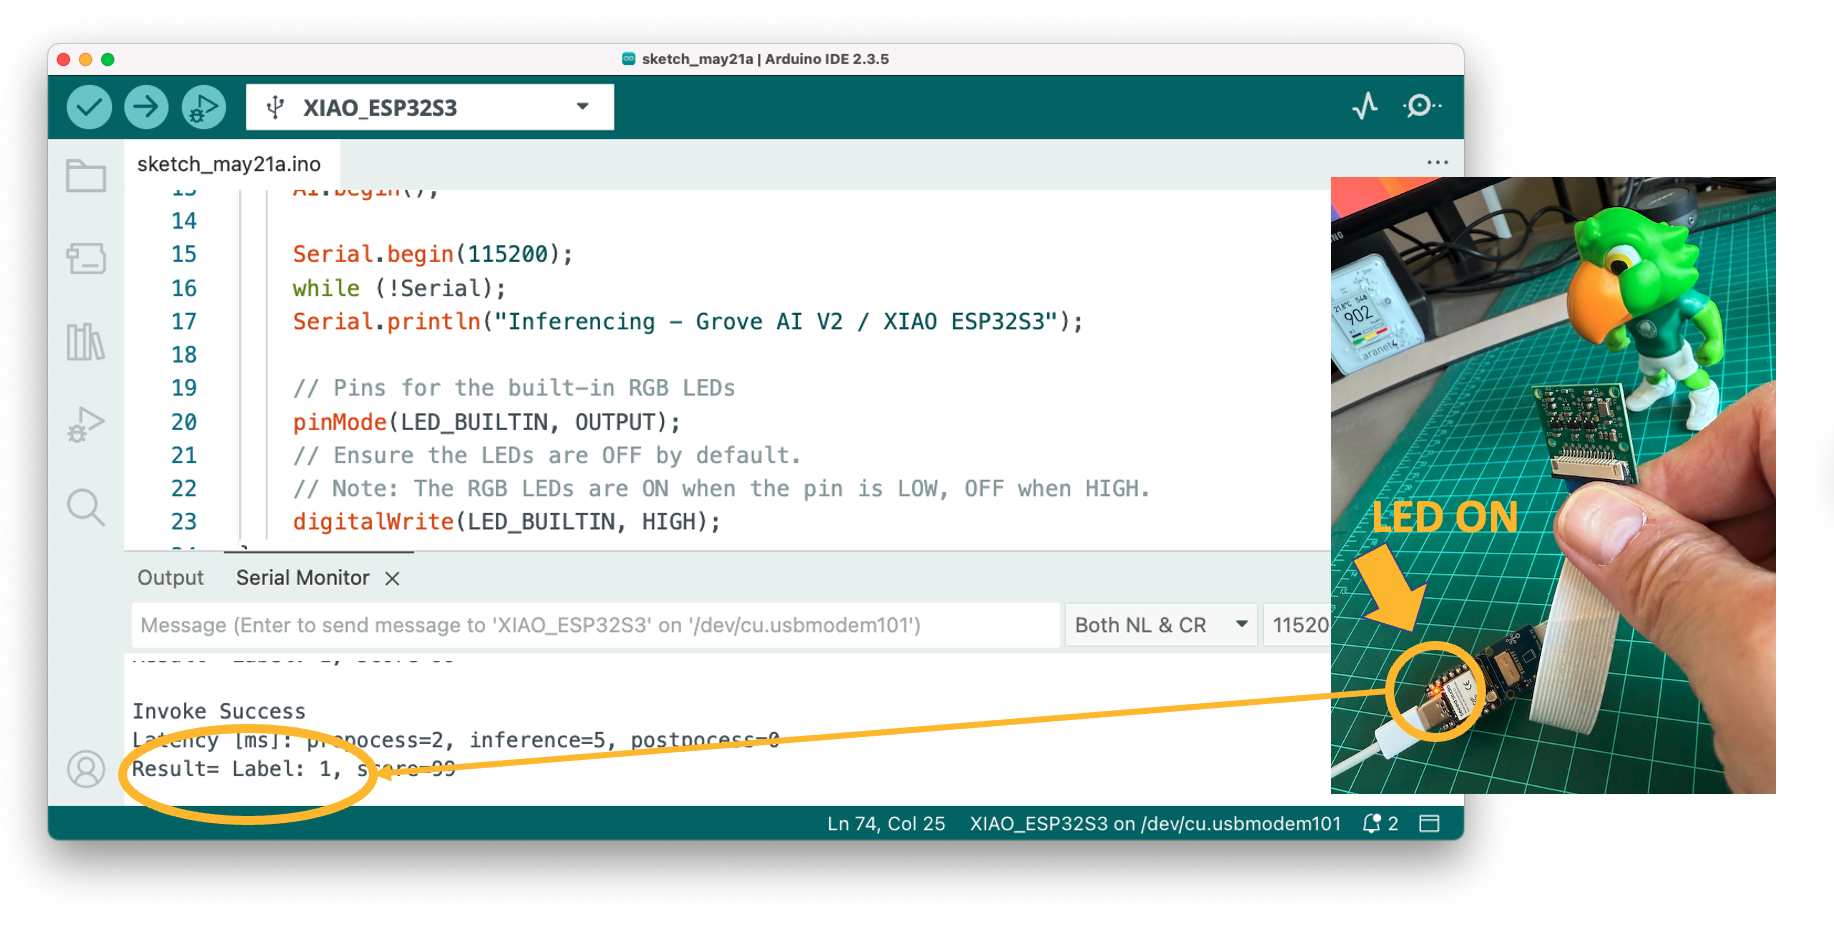
If the Periquito is detected (Label:1), the LED is ON:
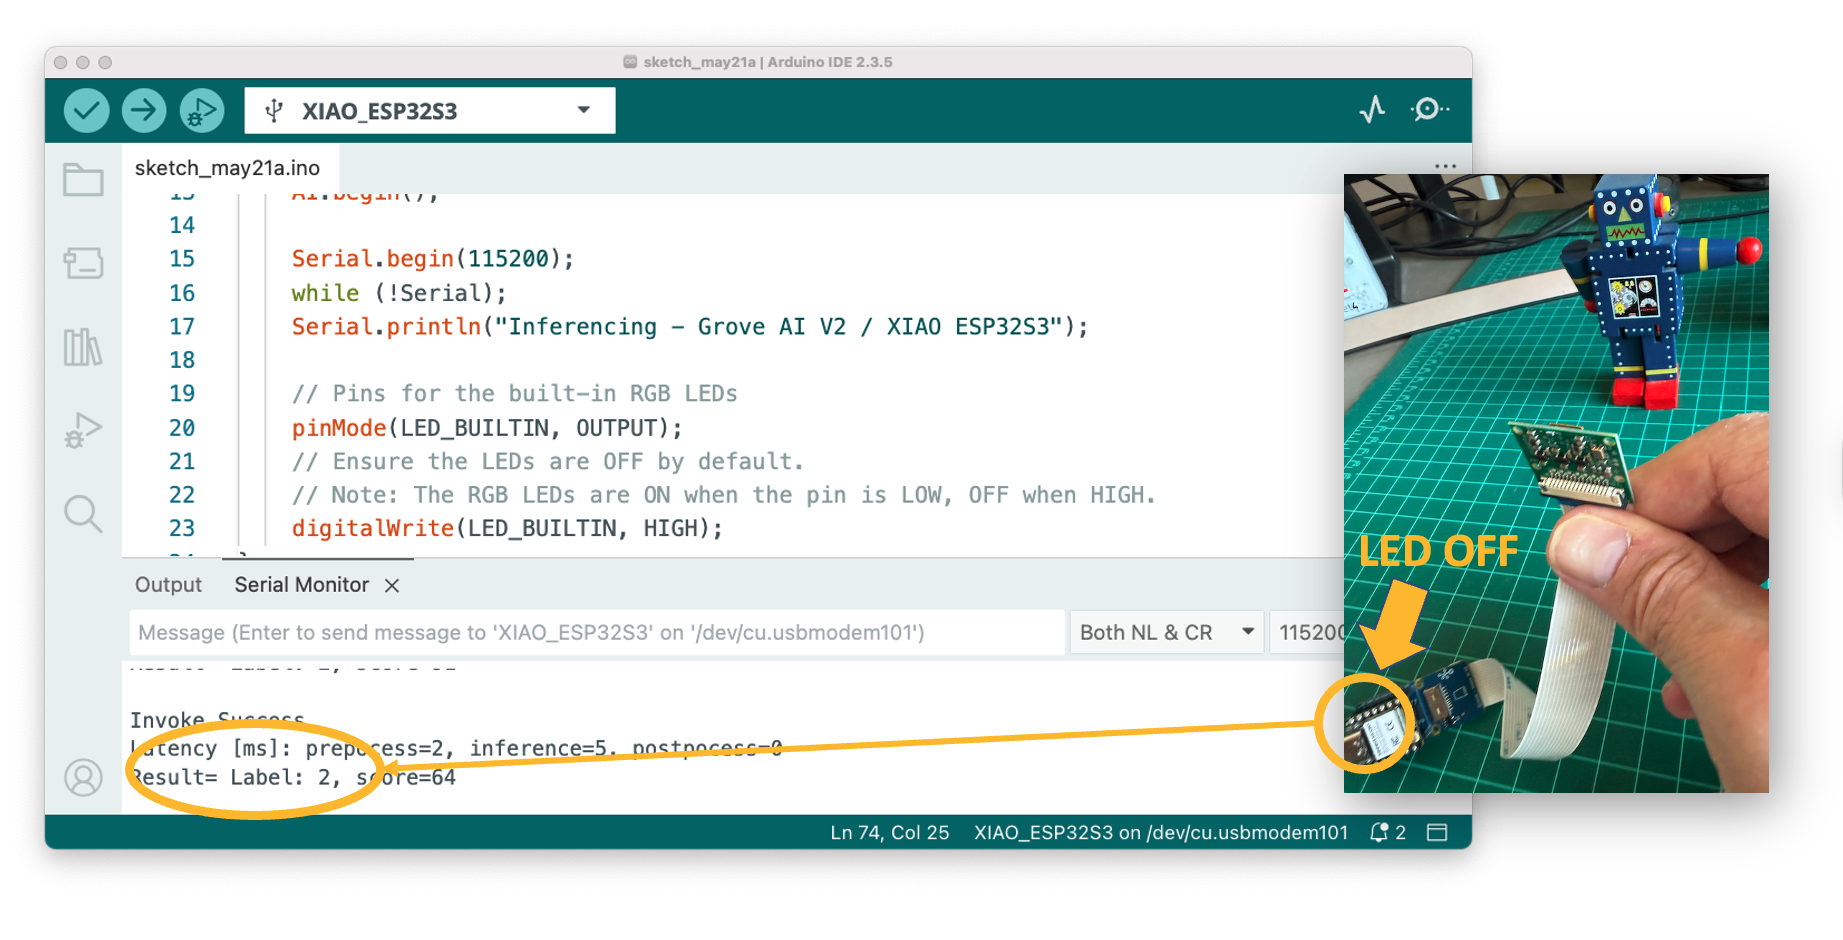
If the Robot is detected (Label:2) the LED is OFF (Same for Background (Label:0):
Therefore, we can now power the Grove Vision AI V2 + Xiao ESP32S3 with an external battery, and the inference result will be displayed by the LED completely offline. The consumption is approximately 165 mA or 825 mW.
It is also possible to send the result using Wifi, BLE, or other communication protocols available on the used Master Device.
Optional: Post-processing on external devices
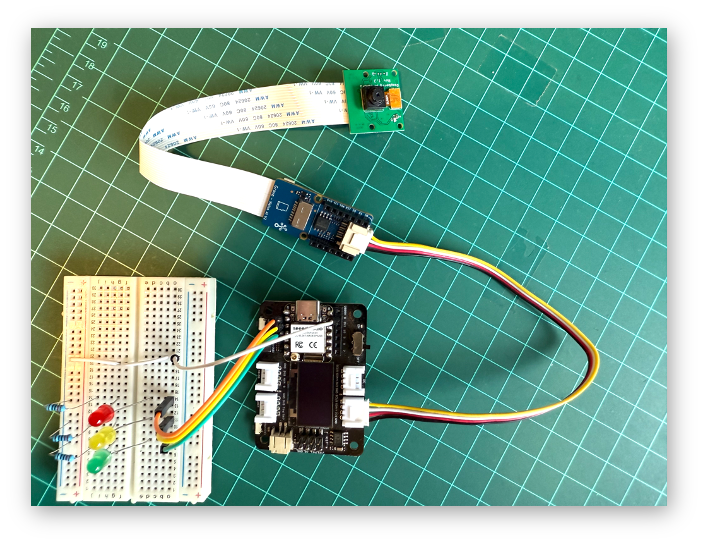
Of course, one of the significant advantages of working with EdgeAI is that devices can run entirely disconnected from the cloud, allowing for seamless interactions with the real world. We did it in the last section, but using the internal Xiao LED. Now, we will connect external LEDs (which could be any actuator).
The LEDS should be connected to the XIAO ground via a 220-ohm resistor.

The idea is to modify the previous sketch to handle the three external LEDs.
GOAL: Whenever the image of a Periquito is detected, the LED Green will be ON; if it is a Robot, the LED Yellow will be ON; if it is a Background, the LED Red will be ON.
The image processing and model inference are processed locally in Grove Vision AI (V2), and we want the result to be output to the XIAO via IIC. For that, we will use the Arduino SSMA library again.
Here the sketch to be used:
#include <Seeed_Arduino_SSCMA.h>
SSCMA AI;
// Define the LED pin according to the pin diagram
// The LEDS negative lead should be connected to the XIAO ground
// via a 220-ohm resistor.
int LEDR = D1; # XIAO ESP32S3 Pin 1
int LEDY = D2; # XIAO ESP32S3 Pin 2
int LEDG = D3; # XIAO ESP32S3 Pin 3
void setup()
{
AI.begin();
Serial.begin(115200);
while (!Serial);
Serial.println("Inferencing - Grove AI V2 / XIAO ESP32S3");
// Initialize the external LEDs
pinMode(LEDR, OUTPUT);
pinMode(LEDY, OUTPUT);
pinMode(LEDG, OUTPUT);
// Ensure the LEDs are OFF by default.
// Note: The LEDs are ON when the pin is HIGH, OFF when LOW.
digitalWrite(LEDR, LOW);
digitalWrite(LEDY, LOW);
digitalWrite(LEDG, LOW);
}
void loop()
{
if (!AI.invoke()){
Serial.println("\nInvoke Success");
Serial.print("Latency [ms]: prepocess=");
Serial.print(AI.perf().prepocess);
Serial.print(", inference=");
Serial.print(AI.perf().inference);
Serial.print(", postpocess=");
Serial.println(AI.perf().postprocess);
int pred_index = AI.classes()[0].target;
Serial.print("Result= Label: ");
Serial.print(pred_index);
Serial.print(", score=");
Serial.println(AI.classes()[0].score);
turn_on_leds(pred_index);
}
}
/**
* @brief turn_off_leds function - turn-off all LEDs
*/
void turn_off_leds(){
digitalWrite(LEDR, LOW);
digitalWrite(LEDY, LOW);
digitalWrite(LEDG, LOW);
}
/**
* @brief turn_on_leds function used to turn on a specific LED
* @param[in] pred_index
* label 0: [0] ==> Red ON
* label 1: [1] ==> Green ON
* label 2: [2] ==> Yellow ON
*/
void turn_on_leds(int pred_index) {
switch (pred_index)
{
case 0:
turn_off_leds();
digitalWrite(LEDR, HIGH);
break;
case 1:
turn_off_leds();
digitalWrite(LEDG, HIGH);
break;
case 2:
turn_off_leds();
digitalWrite(LEDY, HIGH);
break;
case 3:
turn_off_leds();
break;
}
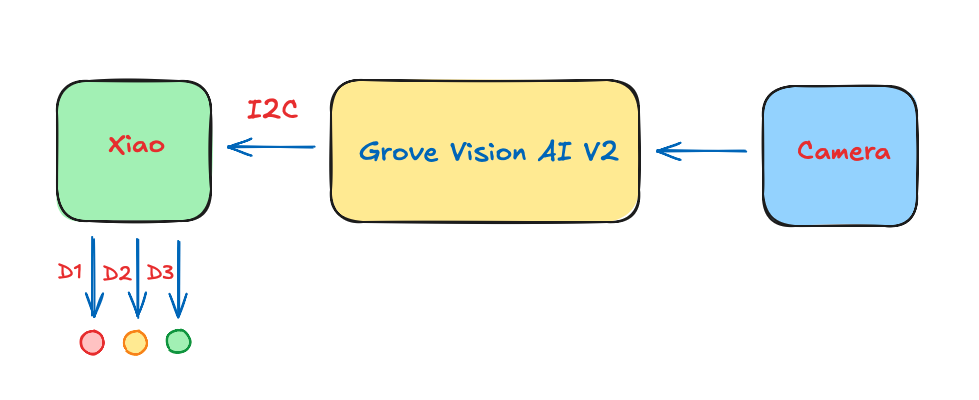
}We should connect the Grove Vision AI V2 with the XIAO using its I2C Grove connector. For the XIAO, we will use an Expansion Board for the facility (although it is possible to connect the I2C directly to the XIAO’s pins). We will power the boards using the USB-C connector, but a battery can also be used.
Here is the result:
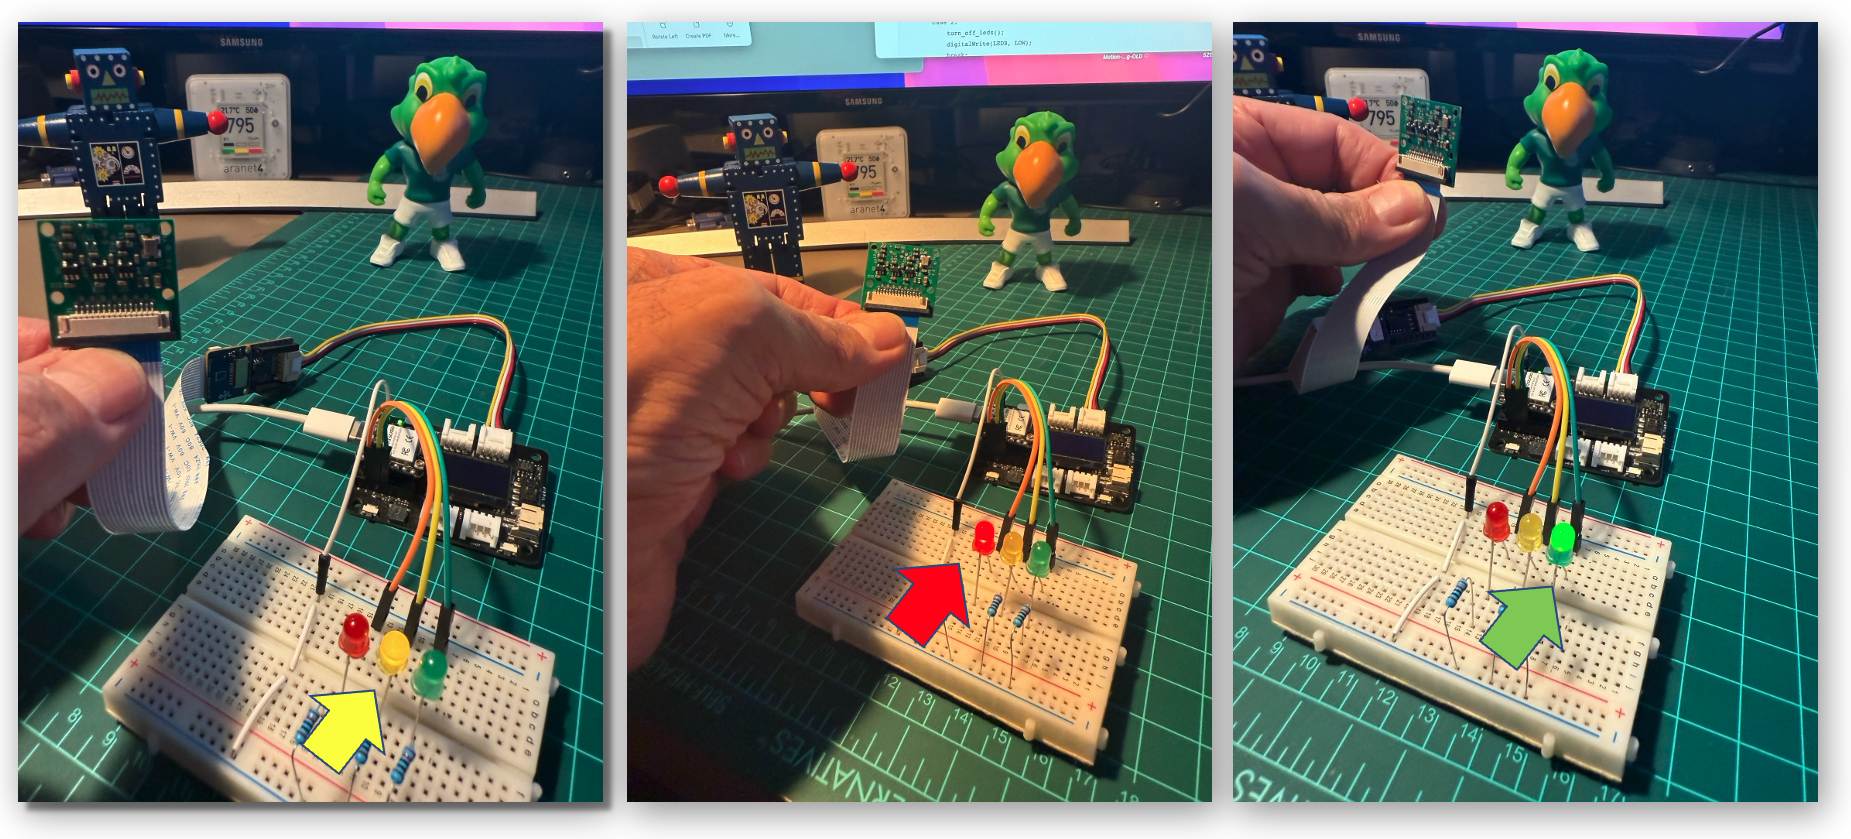
The power consumption reached a peak of 240 mA (Green LED), equivalent to 1.2 W. Driving the Yellow and Red LEDs consumes 14 mA, equivalent to 0.7 W. Sending information to the terminal via serial has no impact on power consumption.
Summary
In this lab, we’ve explored the complete process of developing an image classification system using the Seeed Studio Grove Vision AI Module V2 powered by the Himax WiseEye2 chip. We’ve walked through every stage of the machine learning workflow, from defining our project goals to deploying a working model with real-world interactions.
The Grove Vision AI V2 has demonstrated impressive performance, with inference times of just 4-5ms, dramatically outperforming other common tinyML platforms. Our benchmark comparison showed it to be approximately 14 times faster than ARM-M7 devices and over 100 times faster than an Xtensa LX6 (ESP-CAM). Even when compared to a Raspberry Pi Zero W2, the Edge TPU architecture delivered nearly twice the speed while consuming less power.
Through this project, we’ve seen how transfer learning enables us to achieve good classification results with a relatively small dataset of custom images. The MobileNetV2 model with an alpha of 0.1 provided an excellent balance of accuracy and efficiency for our three-class problem, requiring only 146 KB of RAM and 187 KB of Flash memory, well within the capabilities of the Grove Vision AI Module V2’s 2.4 MB internal SRAM.
We also explored several deployment options, from viewing inference results through the SenseCraft AI Studio to creating a standalone system with visual feedback using LEDs. The ability to stream video to a web browser and process inference results locally demonstrates the versatility of edge AI systems for real-world applications.
The power consumption of our final system remained impressively low, ranging from approximately 70mA (0.4W) for basic inference to 240mA (1.2W) when driving external components. This efficiency makes the Grove Vision AI Module V2 an excellent choice for battery-powered applications where power consumption is critical.
This lab has demonstrated that sophisticated computer vision tasks can now be performed entirely at the edge, without reliance on cloud services or powerful computers. With tools like Edge Impulse Studio and SenseCraft AI Studio, the development process has become accessible even to those without extensive machine learning expertise.
As edge AI technology continues to evolve, we can expect even more powerful capabilities from compact, energy-efficient devices like the Grove Vision AI Module V2, opening up new possibilities for smart sensors, IoT applications, and embedded intelligence in everyday objects.
Resources
Collecting Images with SenseCraft AI Studio.